Release Notes 2022.1.4.0
The April 6, 2022 release of the GlobalLink Vasont Inspire CCMS is available!
What's in this release?
- Enhancements to content authoring
- Enhancements to translation management
- Enhancements to project management
- Enhancements to publishing
- Enhancements to administration
 If you have trouble accessing Inspire, you might need to clear your browser cache.
- Press Ctrl+Shift+Del.
- From the Time range list, select All time, and then select all checkboxes.
- Close the browser.
- Try to access Inspire again.
Enhancements to content authoring
- Use improved navigation
When working in the Oxygen editor, if you insert any of the following links, Inspire automatically opens the last folder you used:
- Map topic references
- Map image references
- Topic image references
- Topic cross references
- Topic content references
This means you don't have to navigate back to the last folder you used every time you insert a reference.
For more details, read:- Save your merged changes as a new file
- While developing content in Inspire using the Oxygen XML Editor, you can compare the latest content with its history of changes contained in snapshots.
- You can also merge any historical changes back into the current version.
- You can save your changes to the current version.
 You can now also save your merged changes as a new file. For more details, read: Compare and merge versions in Oxygen.
- Know what version you're comparing
- When viewing snapshots in Inspire, you now see a label identifying what version you're looking at.
- The label includes the Version name and Date and time the version was created or saved.
- If you choose a snapshot-on-demand to Compare with..., the name of the component also appears before the date. For more details, read:
- Always use the Oxygen viewer
- If you don't want to edit the content in a component, you can just view it in Oxygen and keep it unlocked for other users to work in.
- If a component is locked, you can still view it in Oxygen as read-only.
- While you can't edit the content, you can use any of the Oxygen features for displaying content.
- You can also use the left pane to see the document Outline, and the right pane to see comments and track changes, attributes, and XML validation issues.
- If you want to make changes, you have options in the toolbar to save a copy for editing.
The Oxygen viewer is now the only tool you can use to view a component. All other deprecated viewers are no longer available in Inspire. For more details, read: View a component without locking it.- Edit two different components at once
- While developing content in Inspire using the Oxygen XML Editor, it may be helpful to edit two different components side-by-side.
- Each component is shown in its own pane with its own toolbar and left and right panels.
- You can use this feature in either Author or XML mode.
- You can only edit two documents at once.
- If you close one component, the other is also closed.
 Help/FAQ and follow the steps in Compare and merge versions in Oxygen.
- For more details, read: Edit two components at once.
- Remove all comments at once
 When you're working with other users to develop content in the Oxygen-based editor, you can remove all comments at once.
 - For more details, read:
- Review notifications before the 30-day retention period is over
You can use the Notifications tab to read about the status of a task you've submitted in Inspire.
 Inspire only keeps notifications for 30 days after it's sent.
- It doesn't matter what State the notification is in (Read, Unread).
- All message are deleted 30 days after they're sent unless you delete them first.
- Remember that by default, Inspire also sends notifications to the email address associated with your Inspire account.
- If you need to save a notification for longer than 30 days, you can manage that in your email application.
For more details, read: View your notifications.- The Print option creates a blank page
- When you edit a component, if you need a quick hard copy of the content, you can print what's in the editing pane.
- Click
 Components.
 - In the Folders pane, navigate to the folder where you've saved the component.
- In the Components pane, select the component you want to open.
- To open the file in the Oxygen editor, double-click the component.
- On the toolbar, click the More menu, and select Print.
- Click
 Inspire now shows the content in the editing pane on the Print preview page. For more details, read: Print content in the editing pane.
- Component names with brackets [ ] validate without errors
Previously, if you:
- Create a new component or rename an existing component with one or both bracket symbols ([, ]) in the name.
- Open a map topic for editing.
- Add that component to a map as a topic reference.
You see this result: A Validation error that Escape characters are not properly encoded.
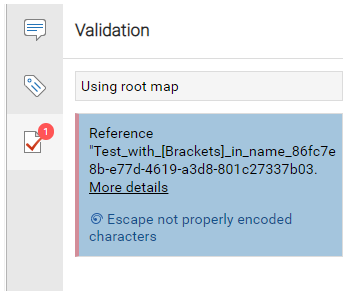 When you add a component with one or both bracket symbols in the name to a map, you don’t see a validation error about escape characters. For more details, read: Add content to a map in Oxygen.
Enhancements to translation management
- Include schema files in a translation job
You can send any type of component to translation, including
- Maps
- DITA topic files
- Images
If you're using DITA specializations in Inspire by uploading custom XSDs, you can now include them in a translation job so the vendor can parse your XML files.- This option lets translators validate the content you send against specialized XSDs instead of the standard XSDs.
- To use this feature, you must select a Translation Project that uses the PD Rest API. If you select a different translation project type, you won't see the option to Include Schema.
- You can also select a Translation Project that uses the manual method. In this case, you would also select Include Schema and the schema zip file is sent along with the translation components.
For more details, read: - Send one component to translation
- Send multiple components to translation
- Automate translation with Project Director
 If you're an administrator and are interested in using this feature, refer to:
 - Go directly to a component used in a translation job
- After you create a translation job, you can view the details from the Translations Management tab.
- Using the context menu
 , you can View details about the job.
 - On the Components tab you can see which files you sent to translation.
- Using the component's context menu , you can now select Go to...
Using this option:
- Closes the View Translation screen.
- You see the Components browser screen.
- In the Folders pane, you see the folder containing the component.
- In the Components pane, the component is selected.
- The component is added to Selected Components panel.
For more details, read: See which components are in a translation job.- Using the context menu
Enhancements to project management
- Cancel the choice of language displays template options
Previously, if you completed the following steps:
- Click Projects.
- Open any project.
- In the Content pane, right-click the Content folder and select Create component.
- On the Create Component screen, in Language, select any language (except for English).
- To clear the selected language, use the backspace key.
- In Language, you see the All Languages placeholder.
You see this result: The list of Available Templates is empty.
Now, when you clear the selected language, the list of Available Templates shows templates for all languages. For more details, read Create a component in a project. - Creating a workflow no longer adds deleted user
- Previously, if you completed the following steps:
- Although it is possible to remove the deleted user and re-assign the task, this issue has been fixed. Deleted users are no longer added to new workflows you create. For more details, read Create a workflow from an existing project.
- When creating a workflow, the Next and Previous buttons are active
- Previously, if you completed the following steps:
- The Next button is inactive.
- The Previous button looks active, but cannot be clicked.
Now, when you create a workflow, all Next and Previous buttons work as expected.- For more details, read Create a workflow from an existing project.
Enhancements to publishing
- Use a new way to open Publish Server
After you publish components in Inspire, you can use Publish Server to see job status and histories, download files related to a job, and re-publish content from an existing job.
You can open Publish Server from a link in the following places:
- In your notification after you submit a publishing job or Open and manage messages on the Notifications tab
- On the Publishing tab, click Go to Publish Server.
For more details, read: Things you can do on the Publishing tab- See more details about the last time a profile was published
- On the Publishing Profiles tab, you can now see more information about the last time a profile was used, including:
- Last Published Status – the user who last published For more details, read: Things you can do on the Publishing tab
- View a publishing profile's history
- After you create a publishing profile, you can use it repeatedly to publish components with a specific export configuration, filters, and XML validation options.
- From the context menu , you can now use the History option to see each time a profile was used to publish content. For more details, read: View a publishing profile's history.
- Deleting a component tells you if it's used in a Publishing Profile
Previously, if you:
- Go to Components.
- Create a component.
- Go to
 Publishing.
 - Create a new publishing profile and select the new component.
- Go to Components.
- Delete the component.
You see this result: A error tells you that the component can't be deleted because there are conflicting statements, when the issue is that the component is used in a Publishing Profile.
When you deleted a component, if it's being used in a Publishing Profile, an error will tell you that and to remove the component from the Publishing Profile before deleting the component. For more details, read: Send a component to the Deleted items folder.- Go to
Enhancements to administration
- Use new options to manage attributes
You can create and update attributes to provide more information about XML elements you use in your content.
Specifically, attributes define properties of elements.
- An XML element can have multiple attributes
- Attributes are always a name-value pair.
You must have Administrator permissions to manage attributes. If you want to use an attribute to profile content, when you create or update an attribute you can now select the Profiled option.- If you select the Profiled option, the attribute is listed on the Profiling Attributes screen for you to select and apply to text.
For more details, read: