Work with publishing profiles
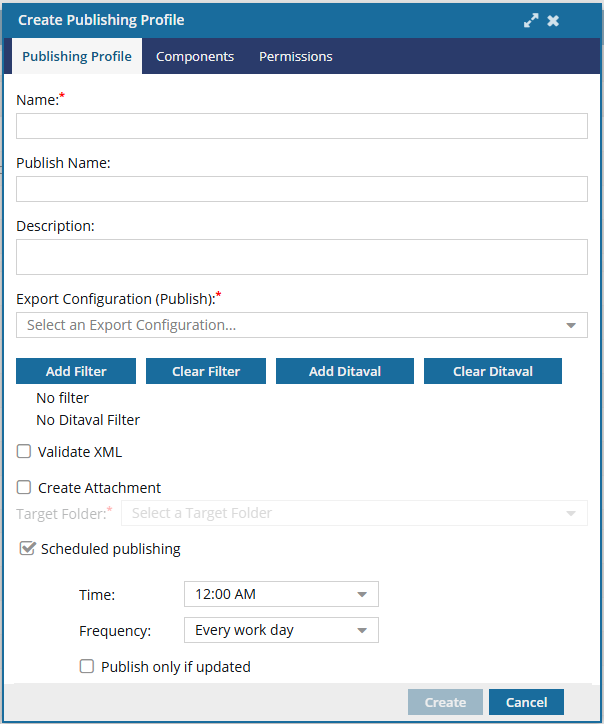
You can create publishing profiles to make it easier to publish content. A publishing profile lets you specify one or more components, an export configuration, filters, validation and scheduling options once so that you can use it repeatedly. You can also use a publishing profile to schedule one publishing event in the future. This lets you schedule components to be published at a later date without having to remember to come back and manually publish the components. You can also publish only once on demand, and it occurs right away.
 Required permissions
You can access the Publishing Profiles tab by clicking the  Publishing icon in the top menu.
- If you are an administrator, you have permissions to the Publishing Profiles tab by default.
- Administrators can also use a checkbox called Show All to see publishing profiles created by all users in your organization.
- If you aren't an administrator, in your Role permissions, you must have module access to Publishing to complete work with publishing profiles.
- If you don't see the Publishing icon in the top menu, contact your administrator.
- If you do see the Publishing icon in the top menu:
- You can see the profiles that you create.
- You can only see other profiles if you are an administrator or you have permissions to the profile.
- If you don't see the
- Anyone who creates a publishing profile can restrict access to it.
- To get permissions to a profile, you can contact the user listed in the Last published By column.
An Inspire administrator can define at the user and role level whether the Publish action is available.
 By default, only administrators can publish content in Inspire.
- You can see the Publish option for a profile only if you're an administrator or have the can_publish module property.

![]() FAQs for Publishing Profiles
FAQs for Publishing Profiles
- Does adding a component create a relationship?
- Can I use tokens in the job Publish Name?
- Can I use DitaVal files in a profile?
- Can I import the published deliverable back into Inspire automatically?
- Can I grant permissions to my profile?
- Can I schedule publishing?
- Can I publish multiple profiles at once?
- Where do I see the profile name in Publish server?
- How do I see the languages I'm publishing?
- Where do I see the Job ID after I publish from a profile?

Does adding a component create a relationship?
Yes.
After you add a component to a publishing profile, Inspire remembers that it is being used. If a user tries to delete the component, they see the following message:
Cannot delete components because one or more are used in a publishing profile. Clear all publishing profile references to these components or remove them from your selection and try again.
 You also see this warning if you try to delete a folder that contains a component included in a publishing profile.
The user sees this warning and can't delete the folder or component(s).
If a user wants to delete the component, they can do one of the following:
- Update a publishing profile and remove this component
- Delete a publishing profile that includes this component
Can I use tokens in the job Publish Name?
Yes.
You can use characters reserved for XPath and system variables in Publish Name. This lets you pull in data so that you don't have to type it in every time you send the components in your profile out for publishing.
- You can use up to 1000 characters to specify tokens. However, if the resolved tokens are more than 1000 characters, they will be truncated.
Examples of ways you can use a token in the job's Publish Name field:
- To add the name of the MyMap component, use
{$componentname} Example Publish Name = MyMap
 - To add the topic title of the MyMap component, use
{$title} Example Publish Name = UserManual - To add the file name of the MyMap component, use
{$filename} Example Publish Name = MyMap_ceb80930-0712-48d2-92a5-9c2ee7d2ff7d.xml - To add the current date and time to the job name for MyMap, use
{$datetime} Example Publish Name = MyMap2024-04-30-111017 - To add the name of the user who created the publishing job for MyMap, use
{$username} Example Publish Name = MyMapjanedoe@mycompany.org - To add the code for the language used in the component MyMap, use
{$langcode} Example Publish Name = MyMapen-US - To add the name of the language used in the component MyMap, use
{$langname} Example Publish Name = MyMapEnglish  If you need a system variable that isn't in the list of examples, contact your Inspire support representative.
- To add the name of the MyMap component, use
- If you use a token in Publish Name, and Inspire can resolve it, the token appears in the following places with the token replaced by actual data:
- On the Publish portal in the Title column.
- In the deliverable name using the following format: Publish-{ComponentName}{token}-YYYY-MM-DD-HHHHMM.
- If you use a token in Publish Name, and Inspire can resolve it, the token appears in the following notifications, if you have them turned on:
- In-app publishing notifications for queued, submitted, and completed.
- Slack publishing notifications for queued, submitted, and completed.
- Email publishing notifications for queued, submitted, and completed.
If you add a variable to Publish Name that XPath can't find, Inspire adds the unknown variable as text to all names and notifications except for the deliverable name.
Can I use DitaVal files in a profile?
Yes.
A DITAVal file (with extension .ditaval) is used in DITA publishing to filter and flag content during output generation. It tells the publishing engine which content to include, exclude, or style differently based on attributes defined in the DITA source.
Follow the steps in:
Can I import the published deliverable back into Inspire automatically?
Yes.
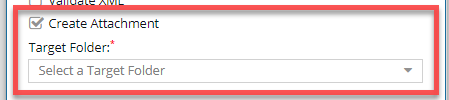
When you create or update a publishing profile, you have the option to Create Attachment. If you select this option, you can specify the folder where Inspire will save the deliverable.
For more information, follow the steps in:
If you use scheduled publishing, the option to Create attachment will not work. For more details, read Work with component attachments.
Can I grant permissions to my profile?
Yes.
When you create or update a Publishing Profile, you can use the Permissions tab to specify which users and roles can access your profile.
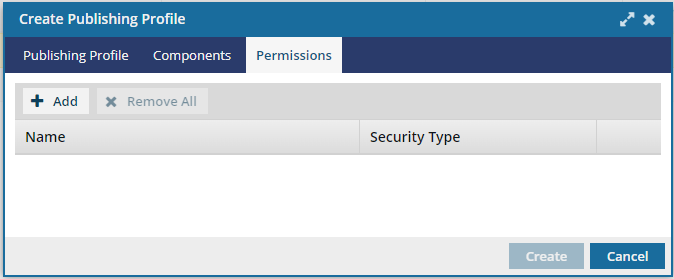
- Besides yourself, anyone you grant access to your Publishing Profile can view it in the list.
- If you don't add any users or roles on the Permissions tab, the publishing profile can be seen by everyone.
- Admins can use the Show All option to see all publishing profiles regardless of permissions
Can I schedule publishing?
Yes.
- If you want to publish only once on demand, you can use a publishing profile to manually send a component or map to be published, and it occurs right away.
- You can also use a profile to schedule the publishing of components once in the future. This creates a publishing request so that you don't have to remember to manually publish the components at a later date.
- If you want to publish content on a regular basis, you can enable an option to schedule the time and frequency when a topic or map is published. You must use publishing profiles to create and manage the schedule. For more details, read Schedule publishing.
- After you set up a publishing schedule for components, you can update the schedule for multiple publishing profiles at once from the Selected Components pane. Use this option when you want to change multiple profiles at the same time. Updating multiple schedules at the same time means they are all set to the same schedule and publish at the same time. For more details, read Reschedule multiple profiles at once.
 If your organization schedules a lot of jobs that are published daily, you can reduce the amount of traffic by selecting an option to check if any of the files have changes and need to re-published.
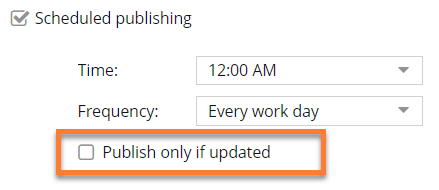
- You can set the Publish only if updated option when creating or updating a publishing profile.
- You must select the Scheduled publishing option to see the Publish only if updated checkbox.
- This option is not available when you publish manually on the Publish component screen.
- If you select this option, Inspire will check to see if there is any new or updated content that needs to be published.
- If there is new or updated content, Inspire publishes all the components listed in the publishing profile (not just the components with changes).
- If there is no new or updated content, Inspire does not send any components in the profile to be published according to its scheduled time.
- Regardless of whether components are sent to be published, Inspire will check again for any new or updated content at the next scheduled publishing time.
If you use scheduled publishing, the option to Create attachment will not work. For more details, read Work with component attachments.
Can I publish multiple profiles at once?
Yes.
After you create a publishing profile, you can publish all the components listed in the profile at once. You can also publish multiple profiles at once.
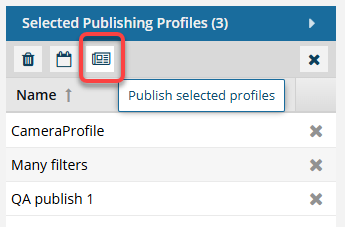
Using the Publish selected profiles on the Selected Publishing Profiles screen creates a separate publishing job for each profile listed.
- You will receive a notification for each component associated with each publishing profile.
- When you publish from a profile, you see the name of the profile you used in Publish server.
- For more details, Track jobs in Publish Server.
When you use the  Publish selected profiles option on the Selected Publishing Profiles panel, associated components are immediately published and you do not see the Publish Component screen. Only the settings in the profile are used to publish associated components. You cannot change the following settings before publishing because you do not see the Publish Component screen:
- Name
- Export configuration
- Filters
- Validate XML
- Create an attachment
- Create a snapshot
To publish multiple profiles at once, follow the steps in: Publish multiple profiles at once.
Where do I see the profile name in Publish server?
- When you publish content from a profile, you see the name of the profile in Publish server.
- If you publish from a component's
 Action menu, the Profile column is blank.
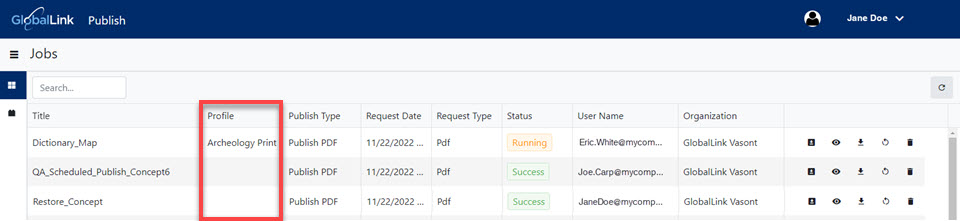
For more details, read Track jobs in Publish Server
How do I see the languages I'm publishing?
Now you can open a publishing profile and go to the Components tab to see what languages are used in the components you are publishing.
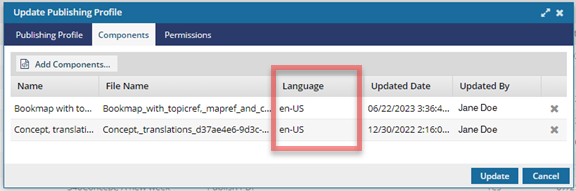
You can see the language used in the component but it's read-only.
- You can't change the component's language from this tab.
- If necessary, Administrators can Change a component's language
Where do I see the Job ID after I publish from a profile?
After you publish from a profile, you can go to the Publishing Profiles tab to show the publishing job Id column.
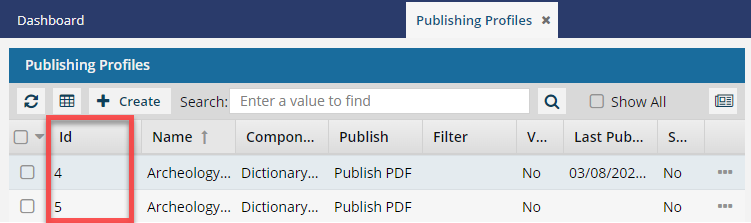
- The Id column is hidden by default.
 To show the column:
- Click on a column heading.
- Select
 the menu dropdown arrow, select Columns, and then select the Id option.
- When you save the Publishing Profile list to a CSV
 , it contains new Id column and its data.
 - When you publish from a Publishing Profile, the job ID displays in the Id column.