Publish your content
After structuring and developing your content in Inspire, you can publish components in a format your customers can read. You can select a transformation configuration provided by Inspire or use your own plug-in to transform DITA content into formats such as PDF and HTML output.
 An Inspire administrator can define at the user and role level whether the Publish action is available.
- By default, only administrators can publish content in Inspire.
- If a user is an administrator or has been added to the can_publish module property, that user can publish in the following places:
 Content Browser — from the right-click menu,
  the Options menu, and the Selected components panel
 Projects — from the right-click menu, the Options menu, and the Selected components panel
 Publishing — for a publishing Profile from the right-click menu, and the Options menu
- The ability to publish from a snapshot is not affected by this module property.

 If you have changed any default notification settings, before you publish content, make sure you have configured your publishing notifications if you want to see them.
Follow the steps in: Set notification preferences for publishing.
 A new notification preference has been added:
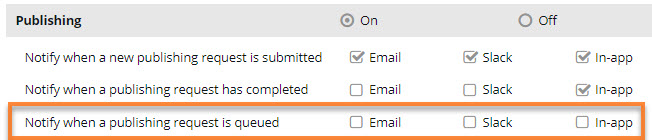
- Notify when a publishing request is queued
By default:
- Existing users don't have this new notification feature selected. This means that they are not notified in Inspire, email, or Slack if a job is queued when they send a component to be published. There is a known issue with this new notification feature. Existing users can't publish until they select at least one option for the new Notify when a publishing request is queued notification:
- In the top right corner of the Inspire menu bar, click
 the Settings option.
 - On the Notifications screen, scroll down to the Publishing notification settings, and in the grey title bar, select On if it isn't selected.
- In Notify when a publishing request is queued, select at least one option, such as In-app.
- Click Save.
 Results:
- Existing users can now publish.
- Existing users can go back to Settings and clear the options for Notify when a publishing request is queued if they don't want to receive the notification. Clearing the options for this notification will no longer impact an existing user's ability to publish.
- In the top right corner of the Inspire menu bar, click
- New users will have this feature checked by default and are notified when they send a component to be published.
- To configure this notification, follow the steps in Set notification preferences for publishing.