Translate to English first
If you create content in a language other than English, you can configure Inspire to translate your content to English first. Then Inspire automatically creates a job to translate the English source to the target language.
![]() You must have permission to be a translation coordinator or be an administrator before you can send a component to translation or manage a translation job.
You must have permission to be a translation coordinator or be an administrator before you can send a component to translation or manage a translation job.
 Tips and tricks
 By default, a translation coordinator can select any unlocked component and send it to translation.
 - However, an administrator can remove the ability to send a component to translation unless it has been approved.
If an administrator sets the optional TranslationApprovedOnly feature to true and enables it:
- In the Components browser, when using the right-click or
 Options menu, the Translate option cannot be selected if the component is not approved.
 - If the topic is approved, for example a map, but the references are not:
- The coordinator sees errors for those components that are not approved.
- The translation job can't be created until one of the following occurs:
- The TranslationApprovedOnly feature is not enabled (set to false).
- The coordinator approves all referenced components.
- On the Translate component screen, the coordinator clears the Include referenced components option.
An administrator must enable the TranslationLockSourceDisabled optional feature. Follow the steps in: Allow files to remain unlocked during translation.
An administrator must turn on one of the following, but not both:
The PivotToEnglish feature. Follow the steps in: Enable the PivotToEnglish US translation.
The PivotToEnglishGB feature. Follow the steps in: Enable the PivotToEnglish GB translation.
- An administrator must configure the translation export configuration to include all referenced content. Follow the steps in: Create an export configuration, and:
- In step 4b, select Translation.
- In step 5, on the Create Export Configuration screen, select the Relations tab. By default, the element name list is empty and all relations apply to all element types defined within the relation. Make sure the element name list is empty so that the translation export configuration includes all referenced content.
- By default, the Pivot to English feature isn't active but an administrator can enable it. For more information, read Plan for special requirements.
- An administrator can now select a dialect for English:
- en-US (the English language as it is used in the United States of America)
- en-GB (the English language as it is used in the United Kingdom)
- An administrator can now select a dialect for English:
You must select a source component that uses a language that is NOT English.
- Before the Translate button becomes active and can be clicked, you must set a value for all required fields and attributes. Required fields are marked with a red asterisk.
![]()

Be aware of restrictions and exclusions that can be applied to components!
- Optional feature restriction for Approval. By default, a translation coordinator can select any unlocked component and send it to translation. However, an administrator can remove the ability to send a component to translation unless it has been approved.
- If an administrator sets the optional TranslationApprovedOnly feature to true and enables it:
- In the Components browser, when using the right-click or Options menu, the Translate option cannot be selected if the component is not approved.
- If the topic is approved, for example a map, but the references are not, the coordinator sees errors for those components that are not approved.
- If the topic is approved, but the references are not, the translation job can't be created until one of the following occurs:
- The TranslationApprovedOnly feature is not enabled (set to false).
- The coordinator approves all referenced components.
- On the Translate component screen, the coordinator clears the Include referenced components option.
- In the Components browser, when using the right-click or
- If an administrator sets the optional TranslationApprovedOnly feature to true and enables it:
- Components can be excluded by a tag. If a user doesn't want a file sent to translation, they can use a component tag to tell other users that translation isn't required. This tag also tells Inspire not to make language copies of it or to send it to translation.
- Inspire provides the pre-defined tag TranslateNotRequired.
- If you apply the TranslateNotRequired tag to a component:
- You see the component marked with
 a tag in the Components browser.
 - Translation coordinators can still add the tagged component to a translation job.
- Inspire makes sure that the component isn't sent with any new translation jobs.
- If you use this tag and the component is an XML file or a binary component such as an image or PDF file, copies of the files aren't created for translation.
- Any links in the component continue to use references in the original language
- You see the component marked with
![]() For a complete list of translation restrictions and issues, read the answers to frequently asked questions.
For a complete list of translation restrictions and issues, read the answers to frequently asked questions.
 Sending components to translation FAQs

To create a translation job for a components:
- Select a components.
- Enter translation details.
- Optionally include attributes.
- Optionally add more components.
- Optionally include reference components for GlobalLink Enterprise.
- Optionally configure automatic publishing of translations.
- Translate or Queue the translation.
- Manage the translation job as it progresses.
1. Select components
 Important notes:
- If a locked review component is added to a translation job, the content sent is the same as what existed at the time it was added to a review.
- No review comments or changes are included in the content sent to the translator.
- Administrators can follow the steps in Allow locked review components to be translated.
Languages. You can only select components that have the same source language. This restriction allows you to submit translation jobs to external applications without encountering an error. If you have components with different source languages, you need to create a separate translation job for each source language
To select multiple components:
-
To select multiple components from the Components browser:
-
Select
 Components.
-
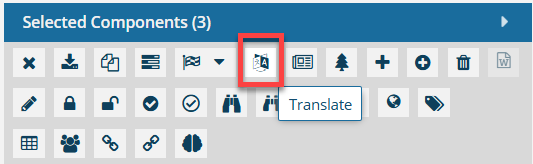
On the Selected Components pane, click
 Translate.
-
On the Create Single or Multiple Translation Jobs screen:
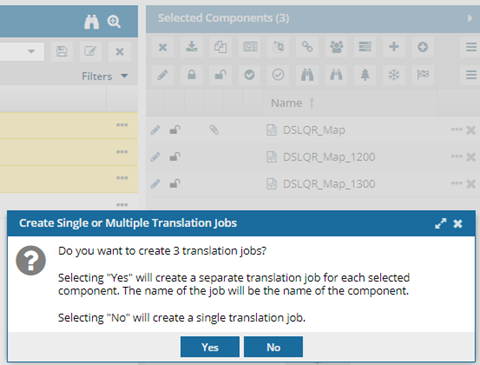
- To create a separate translation submission job for each file, select Yes.
You fill out the information on the Translate component screen once for all separate jobs.
This means all files in the separate jobs need to have the same requirements, such as the target language(s), due dates, export configuration, and translation project.Each job is named differently based on the name of the source component.
Except for the name and component, all separate jobs share the same submission details.
Multiple translation jobs are created. One job per selected file.
You receive a notification for each job separately.
- To create one job that contains multiple files, select No.
You fill out the information on the Translate component screen once for all files in the one job.
This means all files in the separate jobs need to have the same requirements, such as the target language(s), due dates, export configuration, and translation project.The job is named using the first component listed.
- One translation job is created that contains all the selected files.
- You receive one notification for the job.
- To create a separate translation submission job for each file, select Yes.
-
Select
-
To select multiple components from a project:
-
Select
 Projects.
-
In the Content pane, click Expand All
 , and then select the checkbox next to each component you want to translate.
-
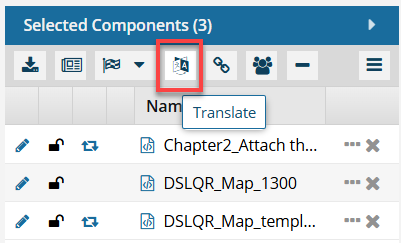
On the Selected Components pane, click Translate.
-
On the Create Single or Multiple Translation Jobs screen:
- To create a separate translation submission job for each file, select Yes.
You fill out the information on the Translate component screen once for all separate jobs.
This means all files in the separate jobs need to have the same requirements, such as the target language(s), due dates, export configuration, and translation project.Each job is named differently based on the name of the source component.
Except for the name and component, all separate jobs share the same submission details.
Multiple translation jobs are created. One job per selected file.
You receive a notification for each job separately.
- To create one job that contains multiple files, select No.
You fill out the information on the Translate component screen once for all files in the one job.
This means all files in the separate jobs need to have the same requirements, such as the target language(s), due dates, export configuration, and translation project.The job is named using the first component listed.
- One translation job is created that contains all files selected.
- You receive one notification for the job.
- To create a separate translation submission job for each file, select Yes.
-
Select
Enter translation details
| 1. | On the Translate component screen, select the Details tab. |
| 2. | In Name, enter a unique name for the job using 100 characters or less. |
| 3. | Optionally, in Description, add details about this component using 1000 characters or less. |
| 4. | Optionally, to automatically populate options on this screen, select a Translation Configuration.
|
| 5. | To identify how the translation work will be completed, choose a Translation Project. Depending on how your organization configures Inspire, you would select one of the following:
|
| 5a. | If you selected a Translation Project that uses integration with GlobalLink Enterprise (PD Rest API), select the Translation Workflow to use in GlobalLink Enterprise (formerly known as Project Director).
Workflows can be customized and will vary. Some examples of a workflow might be:
|
 If your administrator has enabled the feature, you may see an option called Pivot to English. If your administrator has enabled the feature, you may see an option called Pivot to English.
|
| 6. | In Pivot To English, to include a translation to English before the Target language, select Pivot to English. |
If you submit a translation request for a language pair that does not exist in GlobalLink Enterprise, you see a failure notification. If the language pair cannot be found, the translation job will not be created in Inspire. |
| 7. | To select the language you want this component translated to: |
| 7a. | In Translation Target, click Select Languages. |
| 7b. | In the Select translation languages screen, select any of the following:
|
| 7c. | In the Select translation languages screen, click Select. Result:
|
 and then re-expand
 | 8. | In Export Configuration (Translation), select Translation unless you've created a custom export configuration you want to use instead.
|
| 9. | Optionally, to Ignore Content Attributes. select one of the following:
For example, if the only changes made to a topic are attributes used to define where page breaks are, you don't want to run this topic through translation again and incur unnecessary costs. |
| 10. | In Due Date, do any of the following:
|
| 10a. | To add a time, next to 12:00 AM, select the checkbox and then select a time from the list. |
 the calendar icon to open a date picker. The current date is highlighted in blue. To select a day, click the number.
| 11. | To include content for translation only if it has a specific profiling attribute, click Add Filter. |
| 11a. | On the Filter Profiling Attributes screen, do any of the following:
|
| 11b. | On the Filter Profiling Attributes screen, click Select. Result:
|

|
| 12. | To let Inspire add components to this job automatically if any topic references them, leave Include referenced content selected.
|
| 13. | To translate content in the source components that isn't XML, such as images, select Translate Binary. |
| 14. | If your organization is using DITA specializations in Inspire, you can include a custom schema file in the translation job by selecting Include Schema.
|
| 15. | If there was an issue with a previous translation and you want Inspire to translate files again, you can select Force Translation of All Components.
|
| 16. | If you selected a PD Rest API configuration in Translation Project, you can add the Inspire Translation Job Id to the Submission Name by selecting Prepend Translation Job Id to Submission Name. |
3. Optionally include attributes
If the Translation Project type you select has attributes associated with it, you'll see an Attributes tab.
![]()
You only see this tab if you are sending additional details about the job to a GlobalLink application that Inspire can communicate with. You must select one of the following options on the Details tab, in Translation Project.- PD Rest
- SFTP
Translation attributes are created by your organization. Therefore, the attributes shown in the example screen above will be different from what you see on the Attributes tab.
4. Optionally add more components
Tips and tricks
- You must have at least one unlocked component in the translation job.
- If a component is locked for review, you can add it to the translation job ONLY if the TranslationLockSourceDisabled option is set to True. Administrators can follow the instructions in Allow locked review components to be translated.
- If a locked review component is added to the translation job, the content sent is the same as what existed at the time it was added to a review.
- No review comments or changes are included in the content sent to the translator.
- For components that aren't binaries (images), the source languages must all be the same.
- For binary components (images), you can add images translated into other languages if your administrator allows it. Administrators can read: Reuse translated images across language codes.
- When you Add Components, on the Select Components panel, you can set the number of components listed per page. At the bottom of the list, next to Items per page, from the dropdown menu select a quantity.

Inspire remembers how you customize this setting. The next time you open the Selected Components panel, Inspire uses your choice instead of the default. If you want Inspire to forget your customization and return to showing the default number of Items per page, you must re-select the default or clear your browser's cache.
To optionally add more components:
-
On the Translate component screen, select the Components tab.
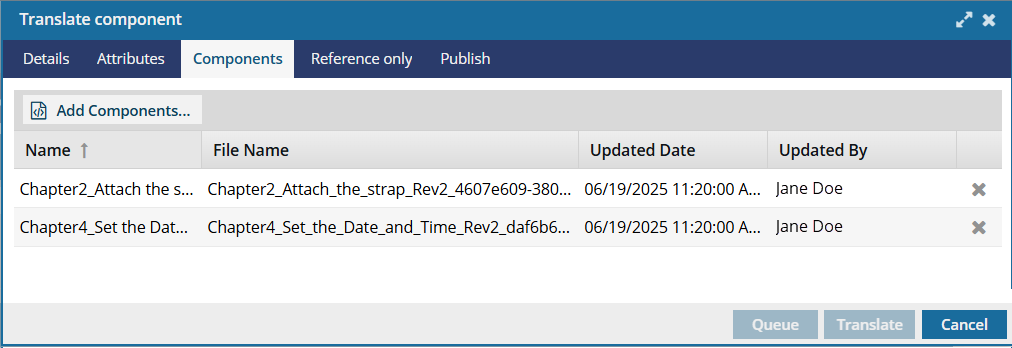 You see the components you selected in the Components browser.
 -
Optionally, to remove a component from the list, click
 Remove.
5. Optionally include reference components for GlobalLink Enterprise
 Tips and tricks
Reference components are not locked in Inspire.
Reference files aren't returned from GlobalLink Enterprise.
You can send the same files for translation and reference only. This is helpful when the linguist might need to refer to the original, such as a map, when making changes.
![]()
You only see this tab if you are sending reference files to GlobalLink Enterprise (formerly known as Project Director). On the Details tab, in Translation Project, you must select PD Rest
To optionally include reference components for GlobalLink Enterprise:
-
On the Select Components screen, click Select.
 Results: You see the reference files listed.
6. Optionally configure automatic publishing of translations
You can have Inspire automatically publish the translated components and import the published deliverable back into Inspire. The translated content is published when the translation job is marked Completed, and Inspire publishes the content according to the Publish Configuration you select.
![]()
To optionally configure automatic publishing of translations:
- On the Translate component screen, select the Publish screen.
- In Publish translated source components when, select Translation language is completed.
- Click Add Publish Configuration...
-
On the Publishing Configurations screen:
- Select the type of deliverable you want to create for the completed translations.
- Click Select.
7. Translate or Queue the translation
![]()
-
On the Translate component screen, verify you've added all the required information by looking at the Queue and Translate buttons to see if they're enabled (blue).
If the buttons are greyed out
 , you haven't added all the required information. Go back to each tab and look for fields with a red star. Ensure you've completed each required setting.
 -
Do one of the following:
- If you select Translate:
- Inspire prepares the job by creating a folder for each language and a copy of the component you want translated. Inspire puts the copy (Target file) into the new language folder. Inspire sets the Reading property and locks the files according to way your administrator has configured locks.
- If you're using an integrated vendor, Inspire contacts them and delivers the files and job settings. The integrated vendor provides Inspire with an ID that allows Inspire to track the job's progress.
- If you're using a manual process, you receive a notification with a link. The translation job content can be downloaded from that link. Then you must send the target files to the vendor for translation and provide them with the job details.
- In the Translations module, on the Translation Management screen, the State is set to In Progress.
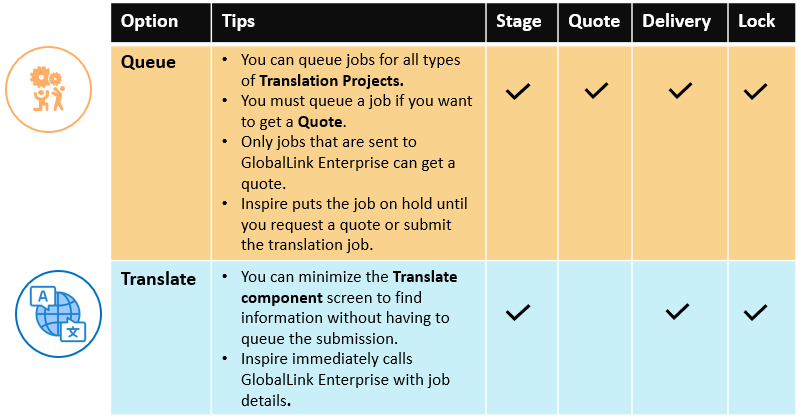
- If you select Queue:
- Inspire prepares the job by creating a folder for each language and a copy of the component you want translated. Inspire puts the copy (Target file) into the new language folder. Inspire sets the Reading property and locks the files according to way your administrator has configured locks.
- In the Translations module, on the Translation Management screen, the State is set to Queued Submission.
The translation job stays on hold until you do ONE of the following:
- Send for quote Important notes:
- In Inspire, an administrator must configure a Translation Integration Method to allow the use of quotes. Enable quotes for translation projects
- In GlobalLink Enterprise, an administrator must configure the associated Translation Project. Configure a GlobalLink project for quotes
- You request a quote for one queued job by selecting an Options menu item called Send for quote. Inspire creates a submission and requests a quote in GlobalLink Enterprise, but does not start the translation job yet. Request a quote for a translation job. On the Translations Management tab, you only see the Send for quote option if the job has the following properties:
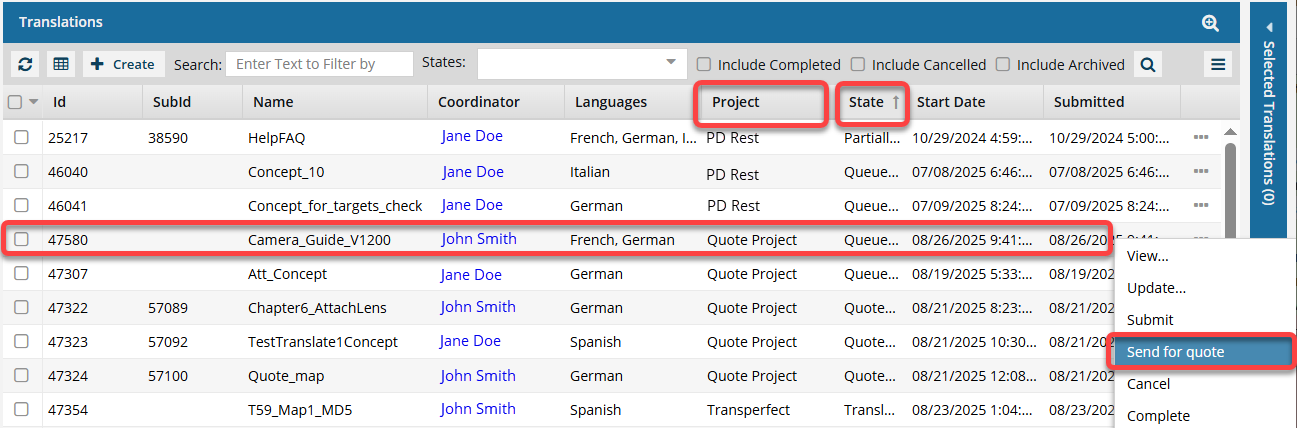
Project must be Quote, or the name of a Translation Project that allows the quote feature to be used.
- State must be Queued Submission. (If the State is Quoted Submission, then the job has already received a quote and can't be sent again.)
- If you select multiple Queued Submission jobs to send for a quote, and at least one job does not use a Project that allows for the quote feature, you will see the Send for Quote and the Submit button in the Selected Translations panel.
 If one of the jobs is not appropriate for the button you select, Inspire will perform the button's action on the appropriate jobs, and the other jobs are skipped.
- To get a quote for the jobs that use a quote Project, select
 Send for quote.
- Any Queued Submissions that don't use the Quote feature are ignored.
- If you click
 Submit:
 - The jobs that have a State of Queued and use the Quote feature are submitted. After the queued job is submitted, the Quote feature cannot be used with this job.
- The jobs that have a State of Quoted are ignored and are not changed in any way.
- All Queued Submissions are started whether or not they use the Quote feature.
- To get a quote for the jobs that use a quote Project, select
- Quotes must be approved for translation work to begin. The Inspire user does not have to approve all quotes before translation work begins in GlobalLink Enterprise. However, this behavior may vary depending on how you have configured your Project in GlobalLink Enterprise.
- If you request a quote, translation work is automatically started after you approve the quotes. You do NOT have to manually Submit the job. Approve a quote for a translation job
- If you don't want to approve a quote, you must cancel the translation job.
- If you are using multiple vendors, a vendor can only begin work if you approve the quote. Not approving a quote for a vendor may result in a translation job being only partially completed. You may have to Force complete the job and resubmit a new translation job for the language or vendors who quote you did not approve.
- In Inspire, an administrator must configure a Translation Integration Method to allow the use of quotes.
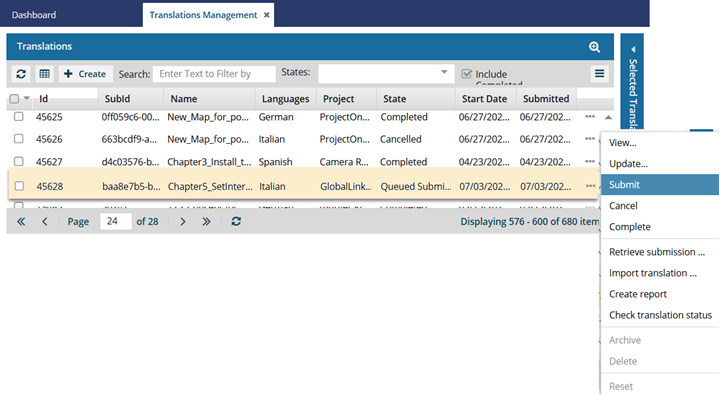
- Submit
Before you submit a queued job, you can update the following job properties:
- On the Details tab: Name (of the job), Description, and (Translation) Coordinator
- On the Languages tab: Cancel (a language)
- On the Components tab: Cancel (a component translation)
- On the Integration tab: nothing
- On the Reference only tab: nothing
Update a queued translation jobAfter you Submit a queued job, translation work in GlobalLink Enterprise starts immediately.
 Submit a queued translation job Inspire lets you know if there are any issues after you click the Translate or Queue button on the Translate Component screen.
 For example, if you include a component that has already been translated but don't select the Force translation of all components, or if you include a component that is already in use in another active translation job.
You are notified in the following ways:
- In-app notifications
 The Notifications screen
- The View Translation screen's Log tab
For more information, follow the steps in: Use the Log tab after creating a job.
- Send for quote
A translation job will fail to be created when the following file conditions exist:- Already in use in another translation job
- Unchanged since the last translation
- Excluded by profiling filters
- Locked for approval when the LockForApprove feature is set to True
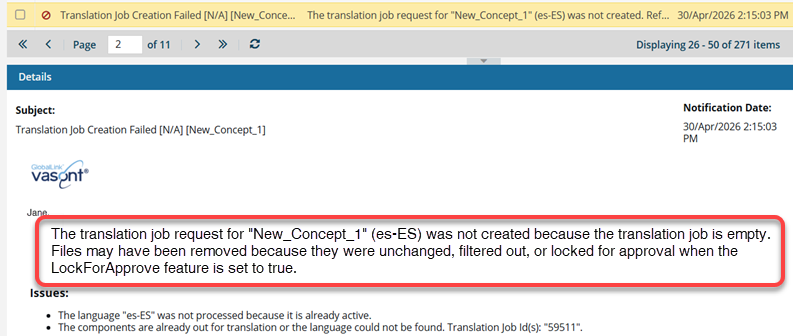
You see an error message telling you:
"The translation job request for $TRANSLATIONJOBNAMES" ($TRANSLATIONLANGUAGES$) was not created because the translation job is empty. Files may have been removed because they were unchanged, filtered out, or locked for approval when the LockForApprove feature is set to true."
- If you select Translate:
8. Manage the translation job as it progresses
Inspire prepares the job
Inspire creates a folder for each language you select. The folder's location is based on the component you select for translation.
If you can't see the translation language folders, make sure you aren't hiding them in the Components browser.- The Folders panel contains a toolbar directly beneath the title bar.
- The last option on the title bar can be selected to hide translation folders. Make sure the Hide translation folders
 option is not selected.
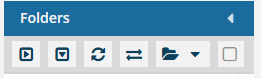
Inspire creates a target language component and puts it into the new language folder. A target language component is created for each language you selected.
Inspire sets the Reading property ("ltr" or "rtl") as it is specified in the language definition when creating target components for translation.
- As the translation coordinator, you'll receive an email notification that the translation job was submitted. Any other users added to the Project configuration on the Notifications tab will also receive notifications.
- When you complete a task that triggers a notification, such as managing translation jobs, the Slack and email message bodies contain:
- The notification with ten or fewer Issues, Errors, and Warnings.
- A link at the bottom of the message [See Full Version].
- You can click the [See Full Version] link to expand a section under the link with the full details.
When Inspire is preparing the job, you may see warning messages that a component was not included in translation job because:
- It is already active in another translation job for the same language
- Its content does not require translation
All Translation Coordinators who receive notifications also see Job IDs in the warning messages:
- The component [COMPONENT NAME] was not included in translation job [ID, JOB NAME, TRANSLATION LANGUAGES] because it is already active in another translation job [ID] for the same language: [ID].
- The component [COMPONENT NAME] was not included in translation job [JOB NAME, TRANSLATION LANGUAGES, ID] because its content does not require translation
- Inspire won't send a component to translation if it's already been translated and there aren't any changes. The only exception occurs when you select the Force Translation of All Components option to overwrite a previous translation.
- Files may have been excluded due to a filter or an export configuration.
- Files can have a tag called TranslateNotRequired to exclude them from jobs. For more information, read Exclude a file from translation using a component tag.
- In Translation Target, to create a request that doesn't fail, you must:
- Select a target language that is different from the language used in the source components.
- Select a target language that exists in your project configuration in GlobalLink Enterprise (formerly known as Project Director).
For example, you include source components that are written in Japanese instead of English. When you request that the source content be translated into Japanese, that creates a language pair of Japanese to Japanese. However, in GlobalLink Enterprise you have a source-target language pair defined as English to Japanese.
- If you submit a translation request for a language pair that does not exist in GlobalLink Enterprise, you see a failure notification.
- If the language pair cannot be found, the translation job will not be created.
Inspire processes the job
- If you selected Translate:
- If you're using an integrated vendor, Inspire contacts them and delivers the files and job settings. The integrated vendor provides Inspire with an ID that allows Inspire to track the job's progress.
- If you're using a manual process, you receive a notification with a link. The translation job content can be downloaded from that link. Then you must send the target files to the vendor for translation and provide them with the job details.
- In the Translations module, on the Translation Management screen, the State is set to In Progress.
- If you selected Queue:
- Inspire does no further processing of the job.
- In the Translations module, on the Translation Management screen, the State is set to Queued Submission.
- To start the translation work with the vendor and finish processing the job, you must do one of the following:
- Send for a quote. After a quote is approved, Inspire automatically starts the translation work. Work with quotes The Inspire user does not have to approve all quotes before translation work begins in GlobalLink Enterprise. However, this behavior may vary depending on how you have configured your Project in GlobalLink Enterprise. If you are using multiple vendors, a vendor can only begin work if you approve the quote. Not approving a quote for a vendor may result in a translation job being only partially completed. You may have to Force complete the job and resubmit a new translation job for the language or vendors who quote you did not approve.
- Submit the job. Select this job and choose to Submit it before Inspire can start communicating with integrated vendors.
- Send for a quote. After a quote is approved, Inspire automatically starts the translation work.
- After you Submit the job, Inspire completes the processing as outlined in the previous item: If you selected Translate.
Completed jobs
- Translation coordinators receive an email notification that the translation was completed. This includes any users added to the Project configuration on the Notifications tab will also receive notifications.
The email notification contains the following information:
- The status. If the job was successfully Completed or Cancelled in GlobalLink Vasont Inspire. For example:
- A translation job that you requested from GlobalLink Vasont Inspire for [17563] "DSLQR_Map" (fi-FI) has been successfully created.
- The translation job [17563] "DSLQR_Map" (fi-FI) was cancelled in GlobalLink Vasont Inspire by "janedoe@mycompany.com".
- The translation job [17563] "DSLQR_Map" (fi-FI) was successfully completed.
- The translation job ID. (For GlobalLink Enterprise and TransPerfect jobs.)
- The translation job Name.
- A list of target Languages used in the translation job.
- User Name of the account that completed or cancelled the translation job.
- The status. If the job was successfully Completed or Cancelled in GlobalLink Vasont Inspire. For example:
- If you selected the Pivot to English option, in Translate to English first, refer to the Results section.
- In the email notification, you can use the link to zip file to download deliverables.
- When translation creates a zip, you see the file name as Translate-{Job Name}-{date/time}.zip.