Configure a PD Rest Integration Method for quotes
As an administrator, you can update an existing method to enable the use of quotes. Queued jobs prepared for GlobalLink Enterprise can be sent out to get an estimate on the cost of translation work if an administrator configures the use of quotes. For the quote feature to function properly, you must configure your Inspire Translation Integration Method to use quotes so that translation Projects can select the quotes integration method.
 Project Director has been renamed to GlobalLink Enterprise.

 Before you begin
- These steps explain how to update an existing translation integration method.
- If you want to create new method for a quotes project:
(a) Follow the steps in: Add a GlobalLink Rest API integration method.
(b) Use the following settings:
- In Display Name, you may want to add the word Quotes so this method can be understood as one that works with quotes.
- Select the Active checkbox
- In Integration Method, select GlobalLink Rest Apis
(c) Authenticate the integration method.
(d) Return to these steps at start at Step 1 to update the method and enable quotes.
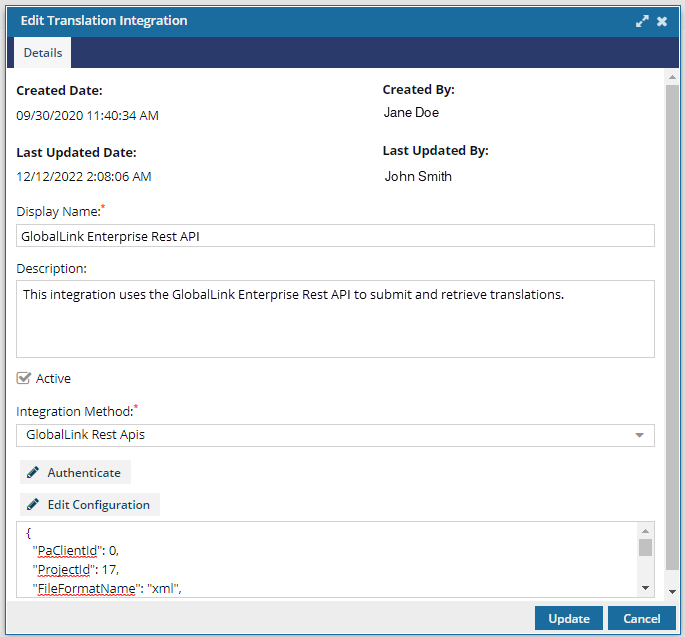
To update a translation integration method:
-
From the
 Administration menu, select Translation Settings, and then Translation integration management.
-
Right-click the method's
 Options menu and select
  Update.
-
In Integration Method, if GlobalLink Rest Apis is not selected, select it.
 If you had to change the Integration Method, click Authenticate. Follow the steps in Authenticate an API translation integration.
 -
On the Edit Translation Integration screen, click Update.
Add Authentication parameters (Step 1 of 3)
Before you begin
- To avoid unauthenticated access, there should be an authentication mechanism used.
- You must get the authentication details such as Client ID and Secret, from your service provider.
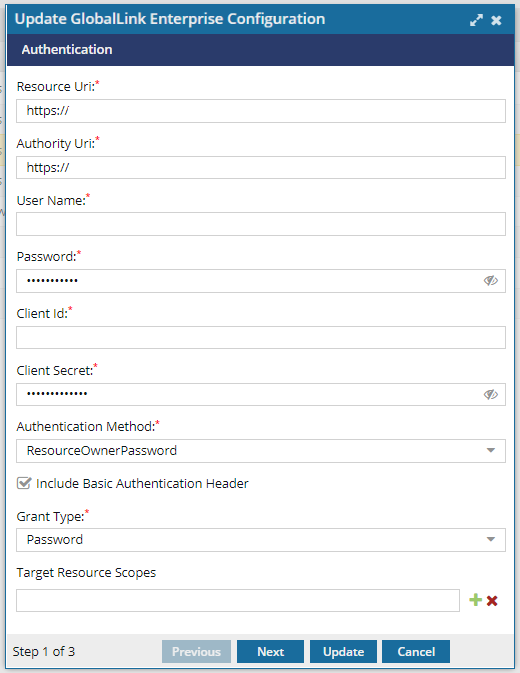
To add Authentication parameters:
-
In User Name and Password, enter the credentials for an account that can log in to GlobalLink Enterprise.
To verify you entered the correct password, you can show the characters by clicking
 Show Password.
 -
By default, Inspire will Include Basic Authentication Header. If you don't want this, clear the option.
The HTTP Authorization request header contains the credentials to authenticate a user agent with a server.
-
In Grant Type, choose one of the following:
After a user's credentials authorize Inspire, the grant type refers to the way Inspire gets an access token.
- Implicit: The access token is returned immediately without an extra authorization code exchange step
- Client Credentials: Used by clients to obtain an access token outside of the context of a user
- Delegation: Used when an application needs to call the API of an application dd-on, registered and configured in Auth0, in the same tenant as the calling program
- Hybrid: Allows clients to obtain some tokens straight from the Authorization Endpoint, while still being able to get others from the Token Endpoint
- Password: The application exchanges the user’s username and password for an access token
-
On the Authentication screen, click Next.
Add Project Information and enable quotes (Step 2 of 3)
On the Project Info (Step 2 of 3) screen, you must add details about the Project you've created in GlobalLink Enterprise to work with translation jobs coming from Inspire.
The options available on this screen are configured in your GlobalLink Enterprise project. If you don't see an option you need, you will need to sign into GlobalLink Enterprise and re-configure your project.
![]()
To add Project Information and enable quotes:
-
In Workflow, select how files will be translated in GlobalLink Enterprise.
It is recommended that you select a type of workflow that is managed by a human rather than a machine translation workflow.
-
If you want to allow a Translation Coordinator to request a quote after a job is queued, select Request Quote.
Important notes:
- You must also enable quotes in your GlobalLink Enterprise translation project. Follow the steps in: Configure a GlobalLink project for quotes.
- If a coordinator requests a quote, they can no longer submit the translation job manually to start the translation work. Inspire automatically starts the job in GlobalLink Enterprise after all quotes are approved in Inspire. Read more in: Understand translation job quotes.
-
In Parsable File Search Regular Expression, add the extension of a file type that you use that isn't a binary, such as a DITA file or map.
Tips
- Use the format of "\.xml" to specify a file type
- Separate each file type's extension with a vertical bar "|"
-
In Non Parsable File Search Regular Expression, add the extension of a file type that you use and is a binary file and can't be searched, such as a .jpeg file or .png.
Tips
- Use the format of "\.xml" to specify a file type
- Separate each file type's extension with a vertical bar "|"
-
To configure Inspire to analyze the translation job files in a submission and automatically create multiple submissions if it exceeds a specific number of documents, in Maximum Document, do one of the following:
In GlobalLink Enterprise, most jobs have a default maximum of 5000 documents.
- To prevent Inspire from splitting large jobs, in Maximum Document enter a value of 0.
- To allow Inspire to analyze jobs and split them up when the number of source components is more than the Maximum Document value, enter a number between 1 and 5000.
-
On the Project Info screen, click Next.
Configure the webhook (Step 3 of 3)
A webhook (also called a web callback or HTTP push API) is a way for GlobalLink Enterprise to provide Inspire with real-time information. A webhook delivers data as it happens, so you can see the status of a translation job in GlobalLink Enterprise immediately.
Before you begin
- The webhook information is unique to your company's connection with GlobalLink Enterprise.
- If you use values that aren't correct, Inspire won't be able to communicate with GlobalLink Enterprise.
- You must acquire the details, such as URL and Auth User, from the service provider.
- If you aren't sure what to use, contact your Vasont account manager or support by email at: GlobalLinkCCMS-Support@TransPerfect.com.
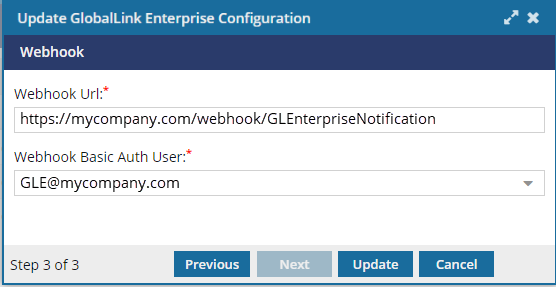
To configure the webhook:
-
On the Webhook screen, click Update.
 Don't forget to create or update a Translation Project: To send for a quote, at least one translation project in Inspire that Translation Coordinators can select must use the integration method that allows quotes.
