Publish from the Components tab

After you've created a component and developed content, you can transform your Inspire content into a format your customers can use, such as PDF or HTML.

An Inspire administrator can define at the user and role level whether the Publish action is available.

  • By default, only administrators can publish content in Inspire.
  • You can see the Publish option only if you're an administrator or have the can_publish module property.
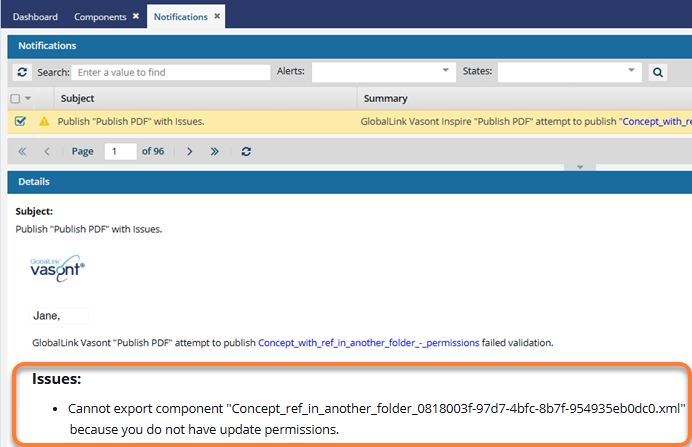
Tips and tricks

  • Set notifications. If you have changed the defaults and want to see publishing notifications, make sure you configure them before publishing. Follow the steps in Set notification preferences for publishing.
  • Attributes. If you've assigned profiling attributes to content, you can choose filtering options to create documents that vary. You can also choose to validate your XML before publishing, or create a snapshot of the component as it exists at the time of publishing.
  • Other places where you can publish. Anywhere you can access a component you can select the Publish option.
  • Use tokens in the job's Publish Name. When publishing a component or from a profile, you can use a token in the job Name to pull in data so you don't have to type it in every time you send the component out for publishing.
  • Find your publishing job by name.

    Inspire creates a Publish Name in the following ways:

    Publish Name is the component's File Name without the GUID IF:

    • You select a single component to publish and you don't select a Publish Configuration.
    • You select a single component to publish and the Publish Configuration you select does not have a default Publish Name.

    Publish Name is defined in the Publish Configuration IF:

    • You select a single component to publish and the Publish Configuration you select has a default Publish Name.
    • You select multiple components to publish and the Publish Configuration you select has a default Publish Name.

    Publish Name is empty IF:

    • You select multiple components to publish and the Publish Configuration you select does not have a default Publish Name.
    • You can enter your own Publish Name with or without tokens.

    For example, if you selected a component named Chpt1_Charge_battery_2696b8b3-0040-463b-abad-6aa200a4fa5e.xml, and use the Options menu to select Publish:

    • By default, the value in the Name field is Chpt1_Charge_battery.
    • You see this Publish Name on the Publish portal in the Title column.
    • Optionally, you can change the Publish Name to a different set of characters.
      • Use 100 characters or less
      • Use underscores (_) instead of spaces
    • If you leave the Publish Name empty, Inspire uses the component's File Name without the GUID.

    If you use a token in the job's Publish Name:

    • Examples of ways you can use a token in the job's Publish Name field:

      • To add the name of the MyMap component, use {$componentname}

        Example Publish Name = MyMap

      • To add the topic title of the MyMap component, use {$title}

        Example Publish Name = UserManual

      • To add the file name of the MyMap component, use {$filename}

        Example Publish Name = MyMap_ceb80930-0712-48d2-92a5-9c2ee7d2ff7d.xml

      • To add the current date and time to the job name for MyMap, use {$datetime}

        Example Publish Name = MyMap2024-04-30-111017

      • To add the name of the user who created the publishing job for MyMap, use{$username}

        Example Publish Name = MyMapjanedoe@mycompany.org

      • To add the code for the language used in the component MyMap, use {$langcode}

        Example Publish Name = MyMapen-US

      • To add the name of the language used in the component MyMap, use {$langname}

        Example Publish Name = MyMapEnglish

      • If you need a system variable that isn't in the list of examples, contact your Inspire support representative.
    • If Inspire can resolve the system variable, the token appears in the following places with the token replaced by actual data:
      • On the Publish portal in the Title column.
      • In the deliverable name using the following default format: Publish-{ComponentName}{token}-YYYY-MM-DD-HHHHMM. However, an administrator can configure Inspire to omit the timestamp from the published file name.
    • If you add a variable to the Publish Name that XPath can't find, Inspire adds the unknown variable as text to all names and notifications except for the deliverable name.

    For more help with tokens, refer to the following topics:

    Keep the following naming issues in mind:

    • The job's Publish Name is not the same as the deliverable (published content) name.
      • You can create whatever Publish Name you want.
      • Deliverables are named by Inspire using the following default format: Publish-{ComponentName}-YYYY-MM-DD-HHHHMM. However, an administrator can configure Inspire to omit the timestamp from the published file name.
    • When you publish from a Publishing Profile, you see:
      • The Publish Name you use on the Publishing Profile tab is shown on the Publish portal in the Profile column.
      • The Publish Name you use on the Publish Component screen is shown on the Publish portal in the Title column.
  • Understand the difference between a Publish and Export configuration.

    • Publish Configuration—You use this new option to identify the publish settings you want to use. This configuration is created by an administrator and may include settings such as:
      • A default Publish Name
      • Skip or validate XML in the components you want to publish
      • Profiling filters
      • Optionally, an administrator can also specify which Export Configuration (Publish) option to use.

        The same settings on the Publish Component screen can also be set by an administrator in the Publish Configuration.

        • If you select options on the Publish Component screen, your settings are used even if they are in conflict with the Publish Configuration that an admin creates.
        • If you select options on the Publish Component screen that don't conflict with the Publish Configuration that an admin creates, then both sets of options are used.
    • Export Configuration (Publish)—You use this option as you normally would, to run the actual export process for publishing content. For example, you can choose options similar to:
      • PDF
      • HTML
      • Zoomin

      The user's configuration choice is used to create the output, even if it is in conflict with the Export Configuration (Publish) set in the Publish Configuration by an administrator.

  • Finding your deliverables. After publishing, you can download your deliverable from publishing notifications or in Publish Server. You can also find the deliverable in Inspire if you selected the Create Attachment option when you were configuring settings on the Publish Component screen. You can find a copy of the published deliverable in the Target Folder you selected.

    After the publishing job completes successfully:

    • A copy of the published deliverable is imported back into Inspire automatically as a binary file.

      The file is named using the following default format: Publish-{ComponentName}-YYYY-MM-DD-HHHHMM. However, an administrator can configure Inspire to omit the timestamp from the published file name.

    • A relationship between the component you published and the deliverable that was imported is created.
      • In the Component's Browser, the component you published now has a black paperclip before its name. This indicates it references another component as an attachment.
      • In the Component's Browser, the published deliverable has a green paperclip before its name. This indicates it is referenced by an another component as an attachment.
      • For more information on attachment relationships, read See component attachments.

  • Monitor the Publishing process. You can use the Publish portal to see job status and histories, download files related to a job, and re-publish content from an existing job. To learn about job management, read Welcome to Publish Server.
    • Open Publish Server from a link in the following places:
    • For the following Inspire publishing formats, you download a ZIP file that includes multiple files:
      • HTML
    • For the following publishing formats, you download a single standalone file:
      • PDF
      • DOCX (the file format used by Microsoft Word to store documents)
      • DocBook PDF
      • DocBook HTML
    • When you use the Zoomin publishing option, you must open the notification and use the link to go to the Zoomin site.
    • For some customers, Inspire provides a publishing configuration and a publishing plug-in for DOCX.
      • If the DOCX publishing option is supported for your organization, when you publish a component, on the Publish Component screen, you can select the Publish Docx option.
      • If published successfully, you can download a deliverable in the DOCX file format that you can open in Microsoft Word.
    • For custom publishing options, you can configure the publishing deliverables.