Open the View Translation screen
After you send components to translation, you can review the job settings.
 The tabs you see when you open the View Translation screen will vary depending on the type of Translation Project you select when creating the translation job. On the Details tab, this is shown as Vendor.
![]()
- You always see the Details, Languages, and Components tabs.
- If the Translation Project type you selected when creating the job has attributes associated with it, then you see an Attributes tab.
- If the Translation Project type you selected when creating the job uses the PD Rest API, then you see a Reference only tab.
- If the Translation Project type you selected when creating the job allows Inspire to communicate with another application such as Project Director, then you see an Integration tab.
If there were issues when creating the translation job, you also see the Log tab.
![]()
- Only errors that occurred during job creation are listed here. Any other errors encountered afterward are not listed here.
- The information on the Log tab is the same as what you receive with in-app notifications and in the Notifications module.
- For more details, read: Use the Log tab after creating a job.

For more information about sending components to translation, read:
![]()
 If the translation job was sent to Project Director, you can now see the workflow used for the submission in Workflow Name.
- When using PivotToEnglish, the same workflow will be used for both phases of translation.
- For example, from a foreign language to English, and then from English to a different foreign language.
To open the View Translation screen:
-
Select
 Translations.
-
On the Translations Management tab, in the list, find the translation you want to view more details for.
On the Translation Management tab, you see a list of translation jobs filtered by your role.
- Both administrators and translation coordinators are able to view translation jobs created by themselves as well as those created by other users.
- Translation coordinators who aren't also admins can select or clear the See All option to filter the list.
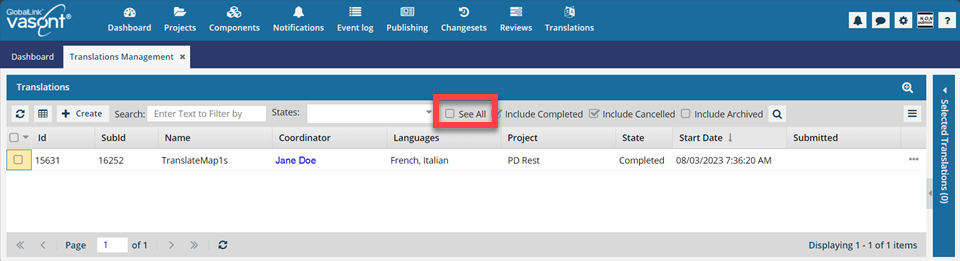 After you select the See All option, you must click
  Search to see an updated list of jobs.
 - Translation coordinators who are also admins don't get the See All option because as an Admin they can already see all jobs in the organization.
- Translation coordinators who aren't also admins can select or clear the See All option to filter the list.
- Users who don't belong to either of these roles don't get the See All option and can only see the translation jobs they created.
If you can't find the job you're looking for, do any of the following:- If there are multiple pages, scroll to the next page using the controls at the bottom of the list.
- Sort the list by clicking a column heading.
- Search for items in the list that contain a key word or phrase.
- Limit the list to show only jobs in a specific state. Go to States, select an option, and then click the search icon
 .
. - Show hidden jobs by selecting the checkbox for Include Archived. By default, the options for Include Completed and Include Cancelled are selected.
- Both administrators and translation coordinators are able to view translation jobs created by themselves as well as those created by other users.
-
To open the View Translation dialog, double click the translation job.
You can also right-click on the job or use the job's
 Options menu and select View.
 -
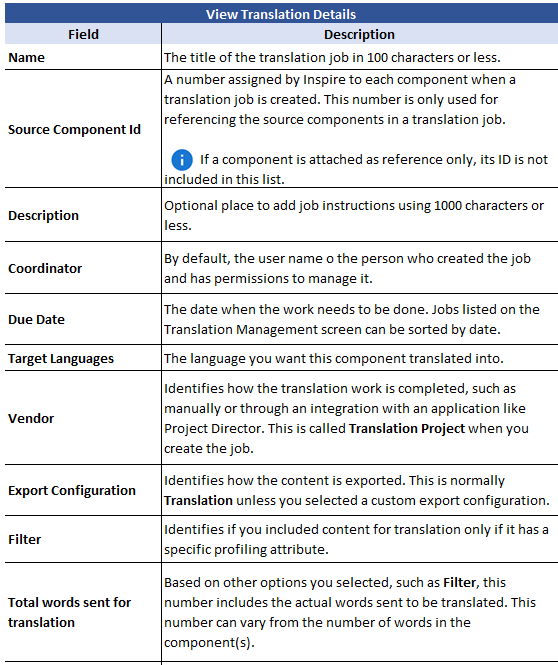
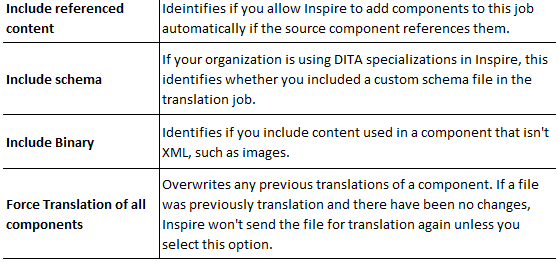
On the Details tab, all required fields are marked with a red asterisk. Use the following table to see details about each field: