Create transitions in a template
Use transitions to configure what happens when a workflow Activity is completed. For example, after the technical review, you can create a transition that specifies the files should go to an editor for review.
 You must have permission to work with workflow templates.
- By default, only users with the following permissions can create project workflows and assignments:
- Administrator permissions
- Access to the Project Module with the Create permission
- Even if you don't have these permissions, you can be granted a special permission to create workflows and project assignments after a project is created.
- If you are an administrator, refer to Allow users to create project assignments and workflows

 Tips and tricks
- You must have at least one starting Activity to create a Transition.
- A transition can only be created from an Activity's toolbar.
You use Transitions to define what the next step in the workflow is and what needs to be done before starting that next step. To add a new transition, you must have created the two Activities that the transition is connecting.
For example, in the Topic workflow template that Inspire provides:
- There is a Review Activity and an Approve Activity
- These Activities are connected by a transition called Send for Approval
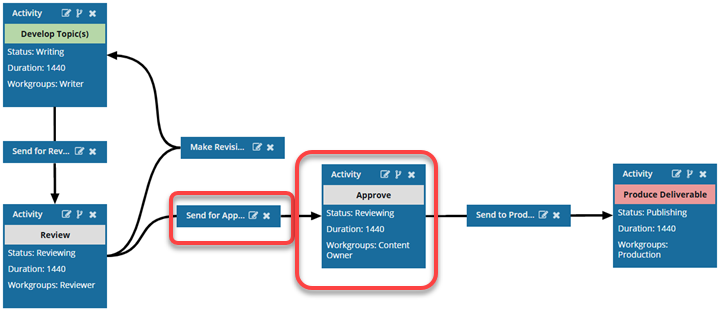
- You can't drag-and-drop arrows to move a transition. You must edit the transition to change the From and To Activity fields.
- You can have multiple transitions that occur after an activity.
- A transition can be created for an action that progresses the workflow, such as Approve.
- A transition can also be created for an action that returns the workflow to a previous step, such as Decline approval.
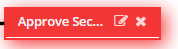
- If you remove an activity that a Transition is linked to, the transition box is highlighted in red.
- If there is also an Action that needs to be done during the transition, such as Take a snapshot, you can create the Action and add it to the Transition. Follow the steps in: Manage actions in a template.
- You can create multiple transitions for one activity if that activity has the Create multiple transitions option selected.
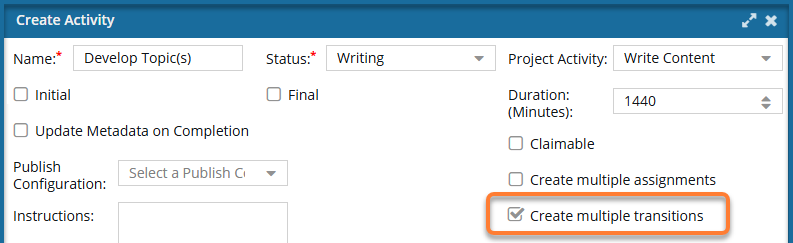
Follow the steps in: Using multiple transitions in a workflow.
- You also can manage transitions in the following ways:
 Before you begin
- The changes to transitions in a workflow will be applied to all new workflows that are started using this template.
- For workflows that use this template and are in progress:
- If the Transition you are updating has not occurred yet, the changes will be applied when the workflows move to the updated Transition.
- If the Transition you are updating has already been completed, the changes will not be applied.
To create a new transition:
-
Click
 Components.
-
In the Folders pane, select Workflows.
 If you have moved the template to another folder, go to that location instead.
 -
In the Components pane, select a workflow.
To open the template, do one of the following:
- Double-click the file
- Right-click the file, and then select Edit...
- Click
 the Options menu, and then select Edit...
 Results: You see the workflow activities and transitions in the editor.
 -
In the Activity's toolbar, select
 Create transition.
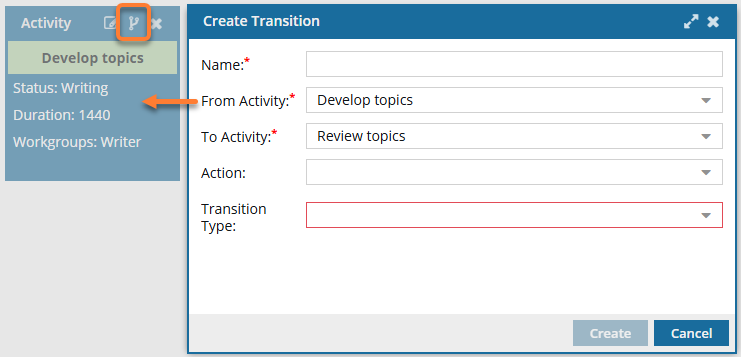 Results: The Create Transition screen opens.
 -
Optionally, if you or your organization has created Actions, such as Take a snapshot, you can select one of the custom actions here.
 Tips
Tips- If you don't see the action you need, follow the steps in: Manage actions in a template.
Currently, there is a limited list of automated Actions that can be performed by Inspire:
InspireCreateReview (Add a Create Review Action to a topic workflow template)
InspireCreateApproval (Add a Create Approval Action to a topic workflow template)
- InspireApprove (Add an Inspire Approve Action to a topic workflow template)
- InspireUnapprove (Automate unapprovals in a workflow)
- InspireCreateTranslation (Automate translation in a workflow template)
- InspirePublish (Automate publication in a workflow template)
- InspireCompletenessReport (Automate completeness reporting in a workflow template)
- InspireTranslationCompletenessReport (Automate translation completeness reporting in a workflow template)
-
To save your changes to the transition, click Create.
Results:
- You can see your new transition with two lines: one line connecting it from the start activity, and one line connecting it to the end activity.
- To move your transition in the editor but not change the start and ending activities, click the transition's title bar, and when you see the move cursor, drag it inside the editor.

The lines connecting the transition to the start and end activities are redrawn as you move the box.
-
To save your changes to the template, do one of the following:
- If you are done updating the workflow, to close the workflow editor, click
 Save and Submit.
 - If you want to keep working but save your changes locally, click
 Save Progress.
- If you are done updating the workflow, to close the workflow editor, click