Start a workflow for a review assignment

Users with permissions can easily start a workflow for a review assignment from a project and assign workflow activities to participants that are included in the review.

When you create a review workflow from a project, the project must include at least one user with review coordinator permissions.

Make sure you meet the following requirements when creating a workflow:

  • The project includes a user with permissions to create a review.
  • Optionally, when adding participants to a project, you can select the Role of Review Coordinators. This list includes all users in your organization that can create a review.
  • For more details about adding participants to a project, read Get started with projects.

You must have permission to the Projects Module to work with projects.

  • By default, only users with the following permissions can create project workflows and assignments:
    • Administrator permissions
    • Access to the Project Module with the Create permission
  • Even if you don't have these permissions, you can be granted a special permission to create workflows and project assignments after a project is created.

To start a workflow for a review assignment:

  1. Open the project where you want to start a workflow for a review assignment.
  2. From the Workflow pane, click Add Workflow plus_icon.
  3. In the Start Workflow dialog, select the review workflow template that you want to use and click Next to advance to the Create Review dialog.
  4. In the Create Review dialog, enter the following information:
    1. In the Title text box, type a title. The title is limited to 50 characters.
    2. If you want to change the review coordinator, select a user from the Coordinator list.
      By default, the Coordinator is the user creating the review.
    3. Use the Start By calendar to choose a date when this review begins. This step is optional.
    4. Select the Start By checkbox to adjust the time when this review begins. This step is optional.
    5. Use the Due By calendar to choose a date when this review is due. This step is optional.
    6. Select the Due By checkbox to adjust the time when this review is due. This step is optional.
    7. In the Description text box, type an optional description or any additional information for this review. The description is limited to 1000 characters.
    8. By default, the Template displays the chosen workflow template.
  5. To add the components associated with this review, click Add Components.
  6. From the Select Components dialog, select the checkbox for Components you want to add to the review or select the folder checkbox to add all components in the selected folder and then click Select.
    Tips and tricks
    • By default, selected unlocked components appear in the Components list with the Review checkbox selected and the Review Scope set to In Review.
    • You cannot review a locked component. The Review Scope for any locked components added to the Component list is set to Context Only. You must add at least one reviewable component to the review. Components in the review are locked by the review coordinator. Components remain locked and cannot be unlocked by anyone until the review is canceled, completed, or archived.

    Inspire checks to see if the component(s) you want to add are in another assignment, project workflow or review workflow.

    • You see warnings if a component is already in use.
    • If you want, you can close the warnings and create the assignment or workflow anyway.
  7. In the Components list, clear the checkbox for any components you want to include in the review as Context Only.
  8. To add reviewers to this review, click Add Reviewer.
  9. On the Select Users dialog, if the list is large or you only want to see a certain type of user, you can narrow the list in the following ways:

    1. To see only names that contain a word or specific letters, in Filter, enter text. For example you can find names that contain "admin", or "review". You can't search for text in any other column except Name.
    2. To see all users but sorted by Name, Security Type, or User Type, click the column heading and then click the grey arrow. To sort by Name or User Type you can also use the Sort By dropdown box.
  10. From the Available Users list, select the checkbox of users you want to include in the review, and then click Select.
    Results: The selected users appear in the Reviewers list.
    You can select a user to be both a Reviewer and a Coordinator for a review. The review remains in reviewing mode until all Reviewers finish their reviewing assignments and then switches to Resolving mode for the Coordinator to complete their reviewing assignment.
  11. In the Reviewers list, select the Track Changes checkbox to change reviewer permissions from Comment Only to Comment and Track Changes.
    You can change the following defaults:
    • All reviewers have Comment Only permission. You can't remove this permission but you can add permission to Track Changes.
    • The Notifications checkbox is selected and users will automatically receive email notifications once their review is ready. You can clear the Notification checkbox for any user so they do not automatically receive email notifications
  12. After you complete your selections, click Next.
  13. Enter the following information for workgroups and participants.
    The WorkGroup names configured for the workflow appear in the first column.
    1. In the Participants column, if the names aren't pre-populated, select one or more participants for each workgroup.
  14. After you finish your selections, click Create to start the workflow.

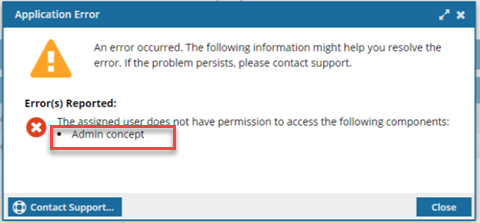
    If you try to assign work to a participant who doesn't have access to the component, you will see an error.

    • The error tells you the name of the restricted component.
    • The Workflow is still started. You can change the participant or the component to resolve the conflict.
    • For details on how to set permissions, refer to: Set permissions.