Edit the configuration information

After you create an Active translation integration method called GlobalLink Rest Apis, and you authenticate your method with GlobalLink Enterprise (formerly known as Project Director), you can see and edit the Configuration Information. When editing a configuration, you use the three-page wizard to specify all your integration details.

Tips and tricks:

  • You must be an Administrator to work with translation integration methods.
  • Project Director has been renamed to GlobalLink Enterprise.
  • Before you can click Edit Configuration, you must Authenticate an API translation integration.

To edit a translation integration method's Configuration Information:

  1. Add Authentication parameters.
  2. Add Project Information.
  3. Configure the webhook.

Add Authentication parameters

Integration configuration basically allows integrating third party services, such as GlobalLink Enterprise, with Inspire.
  • To avoid unauthenticated access, there should be an authentication mechanism used. You must get the authentication details such as Client ID and Secret, from your service provider.

To add Authentication parameters:

  1. From the Administration_TopMenuOpt Administration menu, select Translation Settings, and then Translation integration management.
  2. On the Translation integration management tab, double click the integration method you want to edit.
  3. On the Edit Translation Integration screen, click Edit Configuration.

    Result: You see the Update GlobalLink Enterprise Configuration screen.

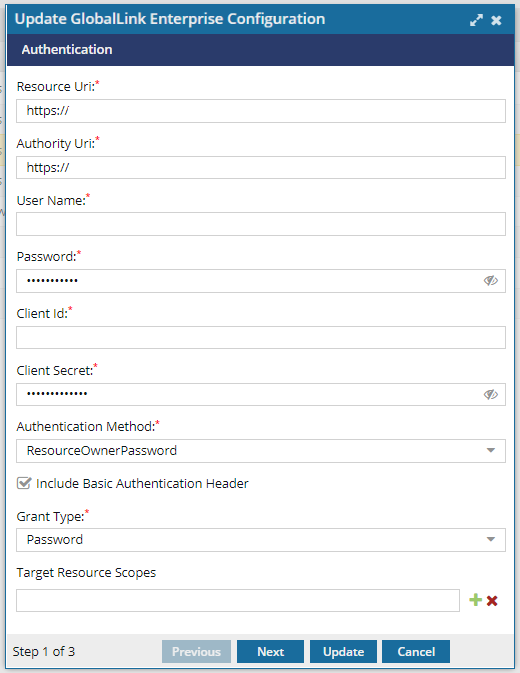
  4. On the Authentication screen (Step 1 of 3), add the following information:
    1. In Resource Uri, enter a Uniform Resource Identifier (URI) as a string of characters that uniquely identifies your GlobalLink Enterprise resource on the internet.
      • A URI can be just a name you've registered, such as mycompanyPD
      • In most cases you can just use the same URL as you use to access your company's GlobalLink Enterprise instance
    2. In Authority Uri, enter the URL to the authorization server where Inspire can present your authorization code and get a token to be authorized to make API requests on behalf of your company.
    3. In User Name and Password, enter the credentials for an account that can log in to GlobalLink Enterprise.
      To verify you entered the correct password, you can show the characters by clicking Show Password.
    4. In Client Id, enter the public identifier for your Inspire instance.
    5. In Client Secret, enter password issued to your Inspire instance.
    6. In Authentication Method, choose one of the following:
      • ClientCredentials - select this if you want to request an access token to access their own resources, not on behalf of a user.
      • ResourceOwnerPassword - select this if you want to provide the credentials (user name and password) directly to the application. The application then uses the credentials to obtain an access token from the service.
      • Delegation - select this if you want to use your authorization to assign a subset of that authorization to another party, without requiring either party to disclose its credentials to the other.
    7. By default, Inspire will Include Basic Authentication Header. If you don't want this, clear the option.
      The HTTP Authorization request header contains the credentials to authenticate a user agent with a server.
    8. In Grant Type, choose one of the following:
      After a user's credentials authorize Inspire, the grant type refers to the way Inspire gets an access token.
      • Implicit - the access token is returned immediately without an extra authorization code exchange step
      • Client Credentials - used by clients to obtain an access token outside of the context of a user
      • Delegation - used when an application needs to call the API of an application dd-on, registered and configured in Auth0, in the same tenant as the calling program
      • Hybrid - allows clients to obtain some tokens straight from the Authorization Endpoint, while still being able to get others from the Token Endpoint
      • Password - the application exchanges the user’s username and password for an access token
    9. The Target Resource Scopes field is not being used at this time so you can leave it empty.
  5. On the Authentication screen, click Next.

Add Project Information

To add project Information:

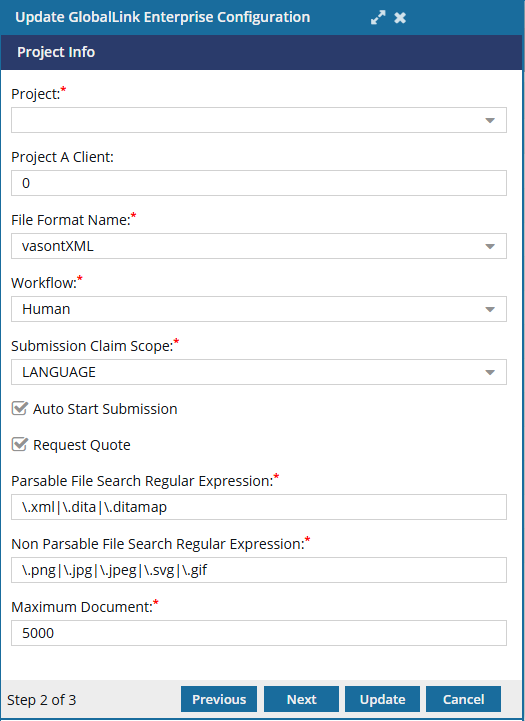
  1. On the Project Info screen (Step 2 of 3), in Project, select an Inspire project used for translation jobs.
  2. Optionally, in Project A Client, enter the name of a client used in the GlobalLink Enterprise submission.
  3. In File Format Name, select the type of files sent to GlobalLink Enterprise for translation.
  4. In Workflow, select how files will be translated in GlobalLink Enterprise.
  5. In Submission Claim Scope, select the scope used in GlobalLink Enterprise for the submission as one of the following:
    • LANGUAGE
    • BATCH
    • FILE
  6. Be default, the submission in GlobalLink Enterprise is automatically started when information is received from Inspire. If you don't want this to happen, clear Auto Start Submission.
  7. In Parsable File Search Regular Expression, add the extension of a file type that you use that isn't a binary, such as a DITA file or map.
    Tips
    • Use the format of "\.xml" to specify a file type
    • Separate each file type's extension with a vertical bar "|"
  8. In Non Parsable File Search Regular Expression, add the extension of a file type that you use and is a binary file and can't be searched, such as a jpeg file or png.
    Tips
    • Use the format of "\.xml" to specify a file type
    • Separate each file type's extension with a vertical bar "|"
  9. To configure Inspire to analyze the translation job files in a submission and automatically create multiple submissions if it exceeds a specific number of documents, in Maximum Document, do one of the following:
    In GlobalLink Enterprise, most jobs have a default maximum of 5000 documents.
    1. To prevent Inspire from splitting large jobs, in Maximum Document enter a value of 0.
    2. To allow Inspire to analyze jobs and split them up when the number of source components is more than the Maximum Document value, enter a number between 1 and 5000.
  10. On the Project Info screen, click Next.

Configure the webhook

A webhook (also called a web callback or HTTP push API) is a way for GlobalLink Enterprise to provide Inspire with real-time information. A webhook delivers data as it happens, so you can see the status of a translation job in GlobalLink Enterprise immediately.

Before you begin

  • The webhook information is unique to your company's connection with GlobalLink Enterprise.
  • If you use values that aren't correct, Inspire won't be able to communicate with GlobalLink Enterprise.
  • You must acquire the details, such as URL and Auth User, from the service provider.
  • If you aren't sure what to use, contact your Vasont account manager or support by email at: GlobalLinkCCMS-Support@TransPerfect.com.

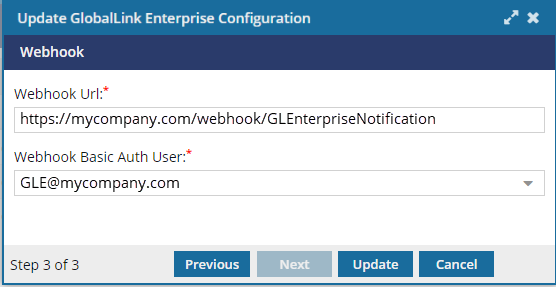
  1. In Webhook Url, enter the name of your company's GlobalLink Enterprise instance, followed by "webhook/GlobalLink EnterpriseNotification".
  2. In Webhook Basic Auth User, select a user who has access to your company's GlobalLink Enterpriseinstance.
  3. On the Webhook screen, click Update.