Create a root folder
You can add folders in the Components browser to organize content to meet your organization's needs. Only root folders are created at the same level as the system folders. They have no parent folder and are the only folders shown when you collapse the folder list. You can only add a root folder using the toolbar.

 If you want to create a sub-folder underneath an existing folder, follow the steps in Create a component folder.
Refreshing folders
There are two ways to refresh the folder list:
- Refresh all folders—To update the entire folder hierarchy, go to the Folders toolbar and select
 the Refresh (all) option.
 - Refresh one folder—To refresh the data for one folder only, select the folder, click
 the Options menu, and select Refresh. Inspire only refreshes the selected folder and shows only the first level of sub-folders and components it contains.
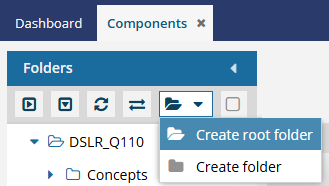
To create a root folder:
-
Click
 Components.
-
On the Folders toolbar, click the Folder menu icon
 and select Create root folder.
-
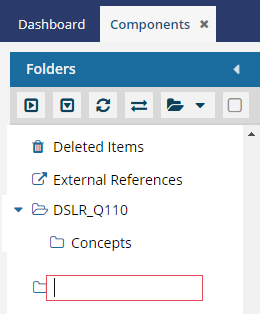
At the end of the folder list, in the empty label box next to the new folder icon, enter a name for the new root folder, and press Enter.
 Results:
- Inspire refreshes the folder hierarchy.
- The new folder is highlighted.
- The new folder displays in the correct place in the alphabetized directory according to its name.
 Working with folder permissions
- After you create a root folder, by default, System and Application Administrators have all permissions to access the new folder.

- System and Application Administrators can update folder permissions to give access to other roles and users.
- If you want to hide the new folder from users who are not administrators, you can set a permission level of None on the folder.
- To change folder permissions, follow the steps in Set folder permissions.
- For more information on how folder permissions work, read Work with folder permissions.