Update an export configuration
After you define what content you want to download from Inspire in an export configurations, you can update any of the settings. This is helpful if you have just created new relations or XML link types and want to use them in an export configuration.
![]() You must have administrator permissions to work with export configurations.
You must have administrator permissions to work with export configurations.
 These steps explain how to add an XSLT file to an existing export configuration. You can also add an XSLT stylesheet when you Create an export configuration.
 For more information on Relations, Source Components, Plugins, and Permissions, read Configure what content is exported.
To update an export configuration:
-
From the
 Administration menu, select Export configuration.
-
On the Export configuration tab, select the configuration and then click the update icon
 .
.
-
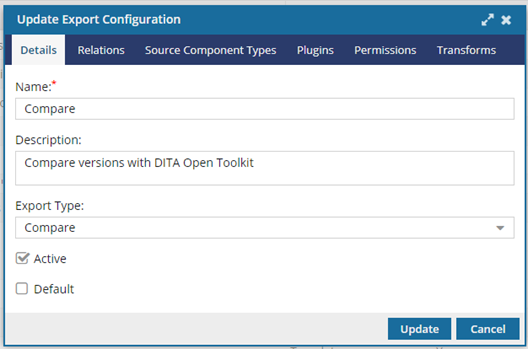
Optionally, on the Details tab:
-
In Description, update any additional information for this export configuration in 1000 characters or less.
 If you don't choose an export type, Inspire assigns Standard to your export configuration.
 -
To use this export configuration automatically when users are exporting, publishing, or translating components, select the Default. Keep in mind that users can select another available option besides the default.
Inspire users who click Publish automatically see this export configuration selected in the Publish Configuration drop down box.
- If you don't select the Default option for any export configurations and only one export configuration is defined for that type, that one configuration is used.
- If you don't select the Default option for any export configurations and there are multiple export configurations for this Export Type, the first default configuration in the list is used.
- If you select the Default option for multiple export configurations for this Export Type, the first default configuration in the list is used.
- To see the list of export configurations, go to the Administration module and select Export Configuration
-
In Description, update any additional information for this export configuration in 1000 characters or less.
-
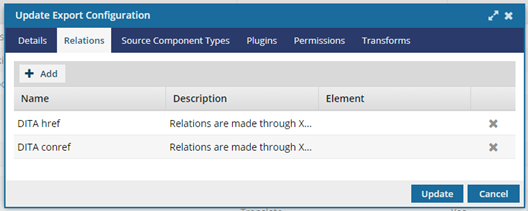
Optionally, to add an element name and limit the export to only the specified element relationship:
-
To add a relation:
i. Click
 Add.ii. On the Add Relations dialog, select the checkbox next to one or more relation, and then click Add.
 -
To limit the export configuration to a specific element relationship, in the relation's row, click the Elements column, and use the drop down arrow
 to select the element name.
By default, the element name is empty and all relations apply to all element types defined within the relation.
to select the element name.
By default, the element name is empty and all relations apply to all element types defined within the relation. -
To remove a relation, in the relation's row, click
 Remove .
-
To add a relation:
-
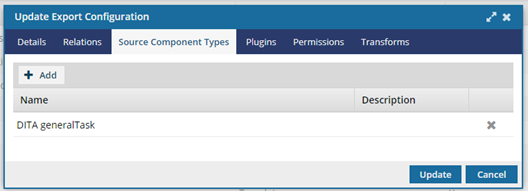
Optionally, to limit the downloaded content to only the types you specify:
-
To add a component type:
i. ClickAdd.ii. On the Add Source Component Types dialog, select the checkbox next to one or more source component types.iii. Click Add.
-
To remove a component type, in the component's row, click Remove.
-
To add a component type:
-
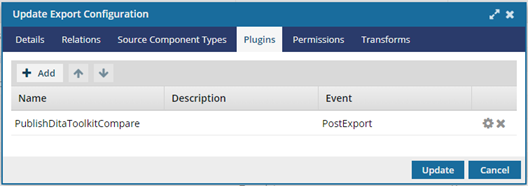
Optionally, to use a plug-in for formatting the output:
-
To add a plugin:
i. ClickAdd.ii. On the Available Plugins screen, select the checkbox next to one or more plugin.iii. Click Add.
-
To remove a plugin, in the plugin's row, click Remove .
-
To change the order in which the plugins are used, in the toolbar, use the
 Up and
  Down arrows.
-
To set plugin parameters, click Settings
 and follow the steps in Configure plug-in parameters.
-
To add a plugin:
-
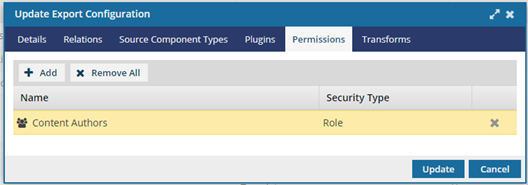
Optionally, to limit which users and roles can select this export configuration:
-
To add a user or role:
i. ClickAdd.ii. On the Select Users/Roles dialog, select the checkbox next to one or more users and roles.iii. Click Select.
-
To remove a user's or role's access, in the user's or role's row, click Remove.
-
To add a user or role:
-
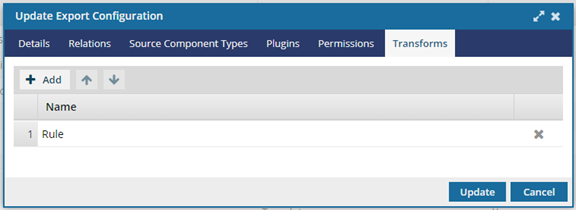
Optionally to use an XSLT to transform output:
-
To add an XSLT file:
i. ClickAdd.ii. On the Select Components screen, in the Folders pane, locate the folder that contains the XSLT file.iii. In the Components pane, select the XSLT file and then click Select.
-
If you have multiple rows of stylesheets, you can set the order in which they are applied.
● To move an XSLT up in the order, click the up arrow.
● To move an XSLT down in the order, click
the down arrow. -
To remove an XSLT, in the stylesheet's row, click Remove.
-
To add an XSLT file: