Unapprove multiple components in the browser
When you're developing content for a component, you can easily let other users know that components have gone back to a draft form by giving them an unapproved ( Draft) state.
 Required permissions
To unapprove a component, you must either be an administrator or have all the following roles and permissions:
- You must be added to the Content Browser's can_unapprove module property. Follow the steps in: Control who can unapprove components.
- You must have permissions to update the component.
Otherwise, you will see the Unapprove option is greyed out and unavailable.

If necessary, an administrator can limit the number of users or roles who can unapprove a component.
- If a user is an administrator or has been added to the Content Browser's can_unapprove module property, that user can unapprove components in the following places:
 Content Browser: From the right-click menu,
  the Options menu, and the Selected components panel
 Oxygen map editor: Look for any green icons in the left Outline panel. They are shown by an icon after the name of the component
 Projects: From the right-click menu, the Options menu, and the Selected components panel
- Project Workflows: Add the InspireUnapprove action to a transition
- If a user is an administrator or has been added to the can_unapprove module property, that user can unapprove components regardless of whether you require electronic signatures.
- If a user is not an administrator or has not been added to the can_unapprove module property, that user cannot unapprove components.
A content owner or administrator can set permissions to deny access to components or folders. If your permissions to content has been blocked, and you are not an administrator, you cannot use the Approve or Unapprove options.
To unapprove multiple components from the browser
 Tips and tricks
- You can use options in the Selected Components panel with only a single component listed. You do not have to select multiple components.
- If you want to add a Label and Comment when you unapprove a single component, add it to the Selected Components panel first. This is helpful because you do not get these options when unapproving a component from the right-click or Options menus.
-
Click Components.
-
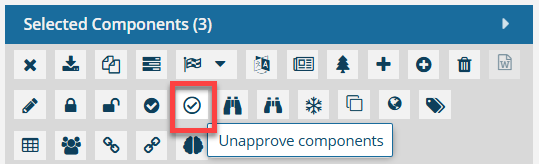
In the Selected Components panel, click Unapprove components
 .
.
-
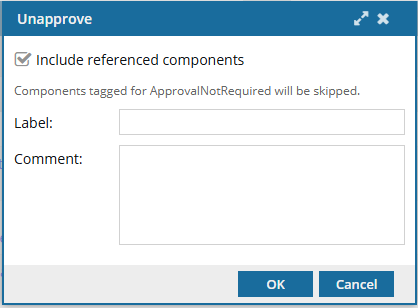
On the Unapprove screen:
-
Optionally, to improve context tracking during the unapproval process, enter 50 or fewer characters in Label, such as a version number or name.
 All selected components receive the same label.
 -
Optionally, to explain why you unapproved the components or provide guidance on next steps, in Comment, enter up to 2000 characters.
All selected components receive the same comment.
-
Click OK.
 Results:
- The components are cleared from the Selected Components panel.
- In the components list, you'll see a blue pencil icon
 next to the unapproved component.
 Go to the
  Notifications module and check for any Issues.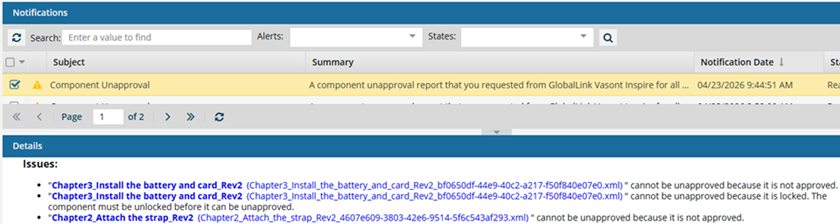
For example, referenced components might be skipped if they are:
- Locked
- In review
- Tagged with ApprovalNotRequired
- Not approved yet
Any previously attached e-signature for approval remains part of the component's history even after you Unapprove a component. Follow the steps in: See Approval signatures.
-
Optionally, to improve context tracking during the unapproval process, enter 50 or fewer characters in Label, such as a version number or name.