Manage the Event log module

As an Inspire administrator, you can manage access to the Event log as a module.

Tips and tricks

  • The Event log option is no longer listed in the Administration menu.
  • It now has its own top menu option called Event log.
  • It's listed after Notifications option and before Publishing.
  • This allows users who aren't administrators access to event logs for troubleshooting.

To manage the event log:

  • By default, users who have the role of System Administrator or Application Administrator have access to the Event log menu.
  • You can grant users who aren't admins permission to the Event logs module. Follow the steps in Update module access permissions.
  • You can still review and manage the logs using the Event log menu. Read Troubleshoot using event logs.

To update module access permissions for the Event log:

  1. From the Security menu, select Module access management.
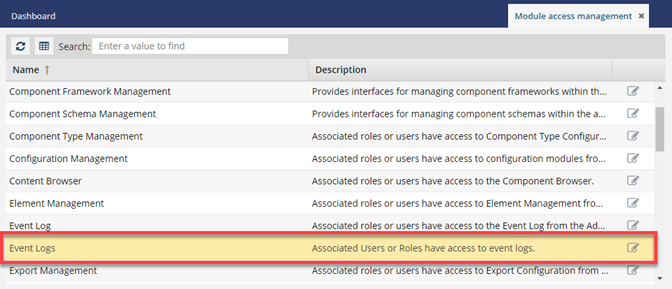
  2. From the Module access management tab, select the Event logs and click Update pencil_icon.
  3. To update user or role module access, complete the following sub-steps.
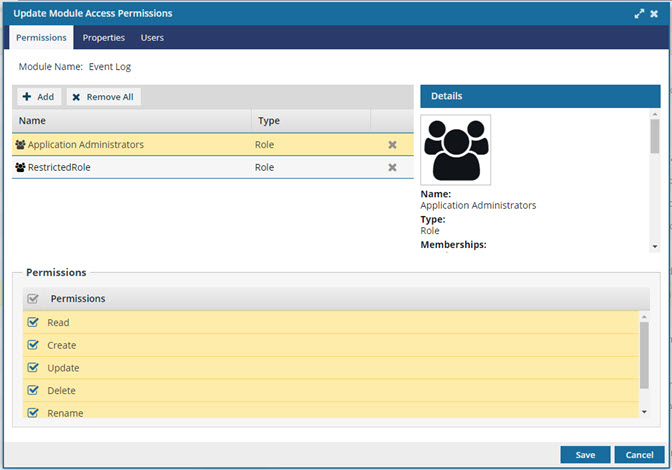
    1. From the Update Module Access Permissions dialog, select the Permissions tab.
    2. Select a user or role.

      You can review the Details of the user or role in the new panel on right. You can see information such as Name, Type, and Memberships of the user or role that has access to the module.

    3. To add users or roles, select Add.
    4. In the Select Users/Roles dialog, select the checkbox next to the name for available users or roles to add to the module.
      On the Select Users dialog, if the list is large or you only want to see a certain type of user, you can narrow the list in the following ways:

      • To see only names that contain a word or specific letters, in Filter, enter text. For example you can find names that contain "admin", or "review". You can't search for text in any other column except Name.
      • To see all users sorted by Name, Security Type, or User Type, click the column heading and then click the grey arrow. To sort by Name or User Type you can also use the Sort By drop-down box.
      • By default, names with a User Type of Support are not included in the list. To see these users, select the Include support users option.
    5. After you finish selecting users or roles, click Select to add the users or roles to the module and return to the Permissions tab of the Update Module Access Permissions dialog.
    6. To remove user or role access to a module, select a user or role and then click remove_icon Remove.
  4. To set user or role permissions for a module, complete the following sub-steps.
    1. From the Update Module Access Permissions dialog, select the Permissions tab.
    2. Select a user or role and then select the checkbox next to one or more permissions to set that permission for the selected user or role.
      The Read permission is selected by default and cannot be removed.
    3. Clear the checkbox next to one or more permissions to remove the permission for the selected user or role.
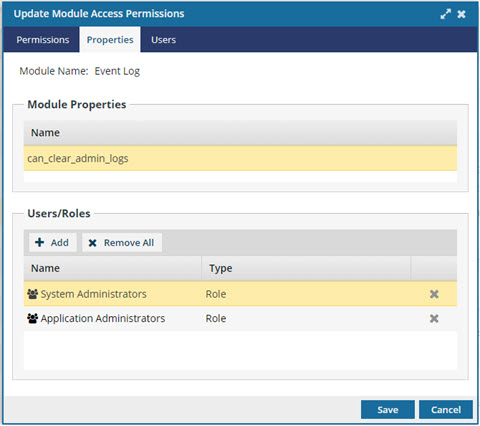
  5. To set user or role permissions for a module property, complete the following steps.
    Module properties identify user capabilities for the module. For example, the module property, can_clear_event_logs, gives a user permission to clear logged events for that module and module property.
    1. From the Update Module Access Permissions dialog, select the Properties tab and click Add.
      You can sort the Available Users/Roles list by Name or Type.
    2. In the Select Users/Roles dialog, select the checkbox next to the name for available users or roles to add to the module property.
    3. To remove permissions for a module property, select the user or role that you want to remove permissions for and click remove_icon Remove.
    4. After you finish selecting users or roles, click Select to add the users or roles to the module and return to Properties tab of the Update Module Access Permissions dialog
  6. To set the permissions, click Save.