Export and create subfolders
You can export multiple components that are contained in different folders and recreate the folder structure in the ZIP file. The Create subfolders option is only used when you're exporting content that you want to import back into another instance of Inspire. The Create Subfolders option is only available when you select content on the  Components tab, from a component folder in the browser.
 Tips and tricks
 When exporting content, the Create Subfolders option is only available in the following places in the browser on the Components tab:
- Content folder
- Templates folder
- Any component folders with subfolders
 The Create Subfolders option is limited because it is designed to be used only to export content from Inspire and import it back into another instance of Inspire.
 Relationships are not updated for the exported folder structure when you import it into another instance of Inspire, and many of them will be invalid. For help with this issue, read Repair component relationships.
 When exporting, the Create Subfolders option is not available in the following places:
- Deleted Items folder
- Snapshots
- Projects
- Assignments

To export components and create subfolders:
-
From the top menu, select Components.
-
To confirm that you want to export subfolders, select Yes.

-
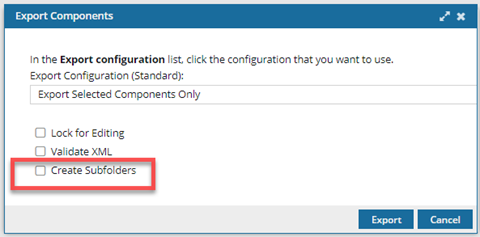
On the Export Components screen:
-
In Export configuration, select an Export Configuration (Standard) from the list.
An administrator can choose an export configuration to be shown automatically as the default. If you need to use something other than the default, you can select another option.
-
If you don't want to allow users to edit the component after you export it, select the Lock for Editing option.
You won't see the Lock for Editing option if a component is already locked by the system or another user.
-
If you want to verify that your XML code in your component is valid according to your framework at the time of export, select the Validate XML option.
By default, this option is not selected.
-
To create a ZIP file with the components saved in the same folder structure as Inspire, select Create Subfolders.
If you select content to export from outside a component folder in the browser on the Components tab, the Create Subfolders option is not displayed or available.
-
In Export configuration, select an Export Configuration (Standard) from the list.
-
Click Export.
Results: You see a message that the export has begun.
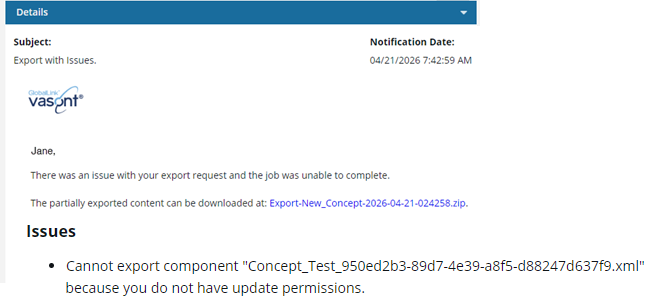
- If you see a warning notification it means that the component was locked during export, or you did not have permission to export the components. If there are any components you don't have permissions to, they are listed in an export warning notification. The components named in the warning are not exported.
- When you complete a task that triggers a notification, such as exporting content, the Slack and email message bodies contain:
- The notification with ten or fewer Issues, Errors, and Warnings.
- A link at the bottom of the message [See Full Version].
- You can click the [See Full Version] link to expand a section under the link with the full details.
If you export more than one component, regardless of whether you include references, the files are packaged in a ZIP file. Exporting multiple components uses the following ZIP name:
Exports-DateTime.zip
- For example, Exports-2024-12-27-050426.zip.
- No Component Name is included.
- If you see a warning notification it means that the component was locked during export, or you did not have permission to export the components.
-
To download the exported content, do any of the following:
- Go to your email Inbox and open a message from noreply@vasont.com with a subject line of Export completed successfully. Click the link to download your exported content.
- In the top menu, click Notifications
 . From the list of notifications, with a subject line of Export completed successfully. Click the link to download your exported content.