Approve a component in the browser
You can let other Inspire users know that a component is finished and ready to publish or translate by giving it an approved state.
 To approve components:
- You must have at least one of the following roles or permissions:
- Be an administrator.
- Non-admins must be added to the Content Browser's can_approve module property. Follow the steps in: Control who can approve components.
- You must have permissions to update the component.
Otherwise, you see the Approve option is greyed out and unavailable.
- The component must be unlocked
 .
. You may be prevented from selecting a component if the ApprovalNotRequired tag has been attached to the component. For more details, read Exclude a file from approval using a tag.
- Before you approve a component, do all the following to prevent seeing errors:
- Remove all tracked changes or comments. Work in the Oxygen editor
- Correct any errors. Validate XML in the editor
After you approve a component in Inspire, to help avoid accidental editing of approved content:
- The approved component may be locked with
 a green system lock.
 An administrator can control if a system lock is placed on the component after a user approves it. By default, this optional feature is set to false, and a lock is not placed on a component after approval.
 - This action happens regardless of whether the approval requires a signature or not.
- To edit an approved component, you must Unapprove it.
- The approved component may be locked with
- If a component contains many referenced components, such as in a map, you can approve a few or all referenced components at the same time. Follow the steps in Approve referenced components.

 You can also approve a component while you're working in the following places:
- Maps. Use the left
 Outline panel to select the map reference and open the
  Options menu to select Approve.
 - Projects. In any of the following places: the right-click menu, the the Options menu, and the Selected components panel.
- Workflows. To automate some or all of the approval process, you can add an Action to have Inspire send notifications to confirm components to be included in the approval, or have Inspire approve the associated components automatically without user intervention.

To approve one component
-
Click
 Components.
-
Click the context menu , or right-click the row, and then select one of the following options:
- Approve (if an electronic signature is not required)
- Approve... (if an electronic signature is required)
-
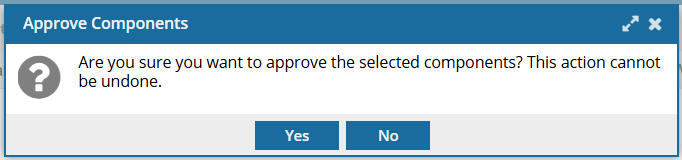
On the confirmation screen, click Yes.
-
You may be required to provide your electronic signature:
-
On the Electronic Signature screen, enter your Full Name and then click Submit.
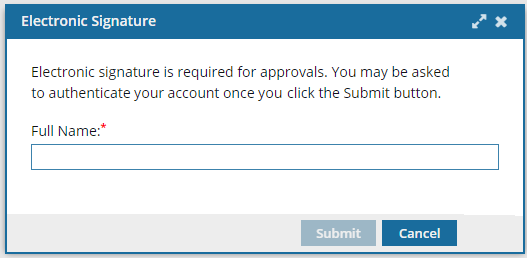
- Do not include underscores or email addresses.
- You must use the name as it appears in your user profile.
- To see what this is, click the
 Profile icon.
 - For example: Jane Doe.
-
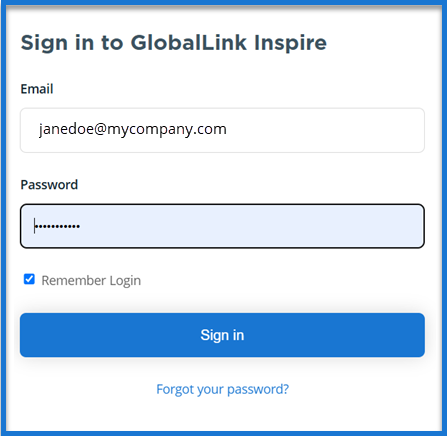
If you are required to authenticate your account, on the log in screen, next to
 the lock, enter your password.
 Notes:
You don't have to re-enter your username. Inspire displays your account's email address for you.
You must use the same password that you log in to Inspire with.
-
On the Electronic Signature screen, enter your Full Name and then click Submit.
-
If there are references to other components from the ones you're approving, you're asked if you want to include them in the approval process. Do one of the following:
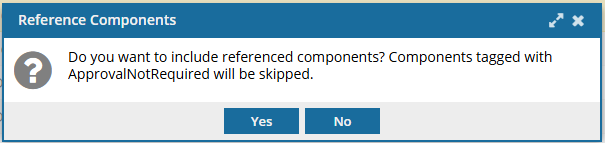
- To approve referenced components along with the selected source components, select Yes.
- To approved only the selected source components, select No.
-
You are returned to the Components browser.
 Results: In the components list, you see:
- One of the following approved icons next to the approved component:
- If no signature is required: a green checkmark
 .
. - If a signature is required: an e-signature icon
 .
.
- If no signature is required: a green checkmark
- The state of the component is changed to one of the following:
- If no signature is required: Approved displays if you hover over the green checkmark.
- If a signature is required: Signed displays if you hover over the e-signature icon.
- The approved component may be locked with a green system lock. An administrator can control if a system lock is placed on the component after a user approves it. By default, this optional feature is set to false, and a lock is not placed on a component after approval.
 Go to the
  Notifications module and check for any Issues.
For example, referenced components might be skipped and not approved if they are:
- Locked
- In review
- Tagged with ApprovalNotRequired
- Already approved
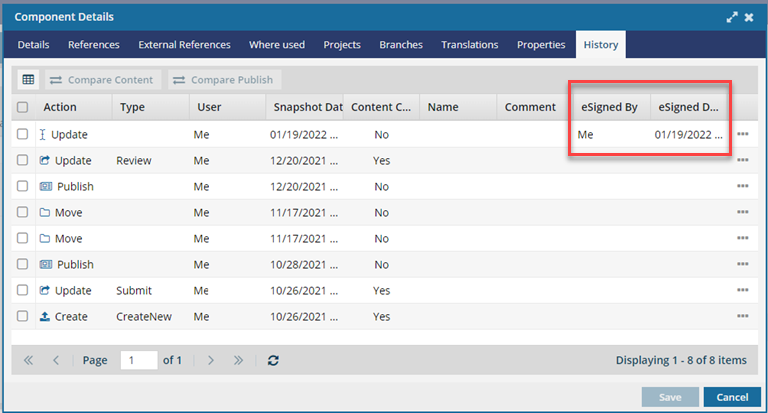
To see the name of the user who signed the approval and the date:- Right-click the component and select Details...
- On the Component Details screen, select the History tab.
- You can see the e-signature details in the two new columns: eSigned By, and eSigned Date.
- One of the following approved icons next to the approved component:
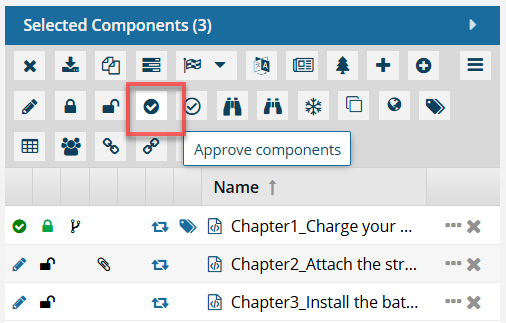
To approve multiple components
-
Click Components.
-
On the Selected Components panel, click
 Approve components .
-
On the confirmation screen, click Yes.
-
You may be required to provide your electronic signature:
-
On the Electronic Signature screen, enter your Full Name and then click Submit.
- Do not include underscores or email addresses.
- You must use the name as it appears in your user profile.
- To see what this is, click the Profile icon.
- For example: Jane Doe.
-
If you are required to authenticate your account, on the log in screen, next to the lock, enter your password.
Notes:
You don't have to re-enter your username. Inspire displays your account's email address for you.
You must use the same password that you log in to Inspire with.
-
On the Electronic Signature screen, enter your Full Name and then click Submit.
-
If there are references to other components from the ones you're approving, you're asked if you want to include them in the approval process. Do one of the following:
- To approve referenced components along with the selected source components, select Yes.
- To approved only the selected source components, select No.
-
You are returned to the Components browser.
Results: You receive one notification for all approvals.The components are cleared from the Selected Components panel.In the components list, you see:
- One of the following approved icons next to the approved component:
- If no signature is required: a green checkmark .
- If a signature is required: an e-signature icon .
- If no signature is required: a green checkmark
- The state of the component is changed to one of the following:
- If no signature is required: Approved displays if you hover over the green checkmark.
- If a signature is required: Signed displays if you hover over the e-signature icon.
- The approved component may be locked with a green system lock. An administrator can control if a system lock is placed on the component after a user approves it. By default, this optional feature is set to false, and a lock is not placed on a component after approval.
Go to the Notifications module and check for any Issues.For example, referenced components might be skipped and not approved if they are:
- Locked
- In review
- Tagged with ApprovalNotRequired
- Already approved
To see the name of the user who signed the approval and the date:- Right-click the component and select Details...
- On the Component Details screen, select the History tab.
- You can see the e-signature details in the two new columns: eSigned By, and eSigned Date.
- One of the following approved icons next to the approved component: