Update project details
If you are a project owner or an administrator, you can update project details when things change. You can only update a single project at a time.

 Tips and Tricks
- If you only want to update Details about the project and users who are Participants, you can do it quickly using the Update option.
- If you want to do any of the following, you must Open a project:
- Add or remove components
- Create or manage an assignment
- Create or manage a workflow
- If you already have a project open, you can update Details and Participants without closing the project.
- To see who the project owner is, look on the Projects Management tab or open a project.
- When you create or update a project, you can now specify a default System Folder to avoid navigating through the entire folder structure when you need to select a folder location.
Update a single project
-
If you already have a project open:
-
Go to the first panel that displays the name of the project, the owner, and dates.

-
In the title bar with the project name, on the right side, click the Edit button
 .
.
-
Go to the first panel that displays the name of the project, the owner, and dates.
-
If you don't already have a project open:
-
Click
 Projects.
-
On the Project Management tab, find the project you want to update.
- Filter the list of available projects by words in the project name. In the Search text box, enter a keyword, and then click the magnifying glass

- Filter the list of available projects to include only those you own or are participating in. In Type, select an option to filter the list by that criteria.
- Add completed projects to the list by selecting Include Completed and then clicking the magnifying glass.
- Filter the list of available projects by words in the project name. In the Search text box, enter a keyword, and then click the magnifying glass
-
Right-click the project row and select Update.
Note: You can also update a project by:
- Clicking
 the Options menu.
 - Selecting Update.
- Clicking
-
Click
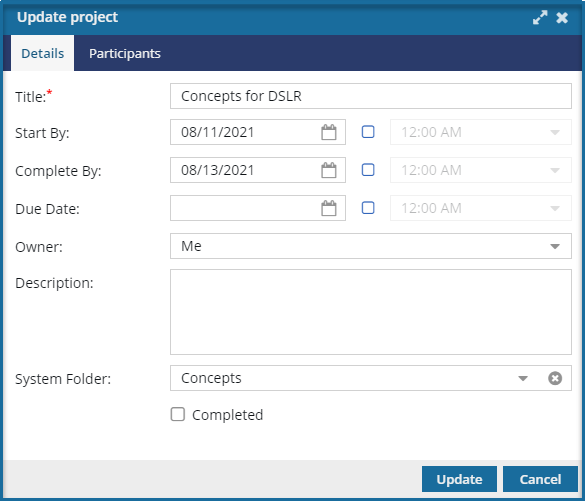
- On the Update project dialog, on the Details tab, in Title, edit the brief description of the project. in 100 characters or less.
-
Optionally, on the Details tab, modify the following information:
- To choose a date when the project begins, in Start By, click the calendar
 to select a the current date or a date in the future.
 - To choose a time when the project begins, after the Start By date, select the checkbox, and then select a time.

- To choose a date when all of the work should be completed, in Complete By, click the calendar to select a date that's after the Start By date.
- To choose a time when the project ends, after the Complete By date, select the checkbox, and then select a time.
- To choose a date when the completed work is due to be handed off to the next stage, such as publishing or a translation vendor, in Due Date, click the calendar to select a date that's after the Complete By date.
- To choose a time when the project is due, after the Due Date, select the checkbox, and then select a time.
- By default, Inspire assigns you as the Owner. To changes this, use the drop down arrow to select a new owner.
- To add more details about the project, in Description, enter text up to 1000 characters.
- To to avoid navigating through the entire folder structure when you need to select a folder location, select a default folder in System Folder.
- To inform participants in a project that the work is done, select Completed.
- To choose a date when the project begins, in Start By, click the calendar
-
To update the users who are working in the project, click the Participants tab, and complete any of the following actions:
- To add a new user to the project, click Add Participant. In Available Users/Roles, select the checkbox next to each group and user who will work on this project. Click Select.
- To see details about a user, including Security type and Memberships, click the row containing the user.
- To remove a user, at the end of the row containing the user, click the Remove button
 .
.
- Click Update.