Create an action in a template
In a workflow, all transitions can include an Action if an additional step needs to be done before the next Activity. For example, you can add an action for a process completed outside Inspire, such as Hire a copy editor. You can also use an action to specify what a user should do in Inspire after the activity is completed, such as Take a snapshot. There is a limited number of actions you can create to tell Inspire to perform automated actions. Currently, the automated actions are limited to creating a review, creating an approval, and approving or unapproving components in a previous Activity.

 Tips and tricks
- Inspire does not provide any default Actions that are manually completed by a user.
- You can create an Action first and then select it when creating a Transition.
- You can create a Transition without an Action and add it later.
- A Transition can only include one Action.
- An Action is unique to the template it's included in.
- If you want to use the new or updated Action in a different template, you have to re-create it in that specific template.
 Before you begin
 Automated actions are only available in a topic workflow template (not a sequential reviewer template) or a completely new workflow template component.
Approval actions. To automate some or all of the approval process, you can add an Action to have Inspire send notifications to confirm components to be included in the approval screen, or have Inspire approve the associated components automatically without user intervention.
- Use the approval notification action (InspireCreateApproval). Inspire sends an email notification to each user in the Review workgroup (or the workgroup assigned to the previous user activity). The workgroup users can confirm if they want to include component references in the approval process.
- After a user in the Review workgroup confirms whether to include component references in the approval process, Inspire uses that information during the approval process.
- No approval actions occur during this automation. Approval can occur manually or in the InspireApprove action.
- You must configure it exactly as described in: Add a Create Approval Action to a topic workflow template. Otherwise, Inspire won't understand the Action as an automated process.
- Use the automatic approval action (InspireApprove). When the workflow advances to the Send for Approve Transition, Inspire automatically approves the components in the review.
- No referenced components are included in the approval, and no user interaction occurs unless a signature is required.
You must configure it exactly as described in: Add an Inspire Approve Action to a topic workflow template. Otherwise, Inspire won't understand the Action as an automated process.
- Use the approval notification action (InspireCreateApproval). Inspire sends an email notification to each user in the Review workgroup (or the workgroup assigned to the previous user activity). The workgroup users can confirm if they want to include component references in the approval process.
- InspireUnapprove. To automate the unapproval process, you can add an Action to have Inspire send notifications to confirm components to be included in the unapproval screen.
- When the workflow task is advanced, this action automatically unapproves components and returns them to the Draft state.
- The unapproval process runs silently (without user intervention and does not produce a notification).
- You must configure it exactly as described in: Automate unapprovals in a workflow. Otherwise, Inspire won't understand the Action as an automated process.
InspireCreateReview.
By default, the Transition from the Developing topics Activity to the Reviewing content Activity is completed manually by the user in the Writer Workgroup.
To automate the process, you can add an Action to have Inspire open a new Create Review screen automatically and populate any known details so that the workflow user can quickly create the review and advance the workflow to the next stage (Reviewing).
- You must configure it exactly as described in Add a Create Review Action to a topic workflow template. Otherwise, Inspire won't understand the Action as an automated process.
- InspireCreateTranslation.
- When a user advances a project workflow Activity, and the next Transition has an Action of InspireCreateTranslation, Inspire does the following:
- If a workflow has more than one component, the user can select what to translate. For example, the workflow might contain maps, topics, images, and PDFs, and the user wants to translate only the map.
- If a workflow has more than one component, the user can choose if they want to create a single job or multiple jobs.
- The user is shown the Translate component screen.
Inspire uses the Activity workflow details to populate the following information: Name (uses the Component name), and Components. To create this action, follow the steps in: Automate translation in a workflow template.
- When a user advances a project workflow Activity, and the next Transition has an Action of InspireCreateTranslation, Inspire does the following:
- InspirePublish.
- In an active workflow, this action tells Inspire to check how many components are included in the previous Activity (such as Approve components) and take one of the following actions:
- If there is one XML component, Inspire opens the Publish Component screen. The publishing job Name is prepopulated with the name of the component. The user must fill out the required fields and click Publish. You see a notification that the publishing job has been created.
- If there is more than one XML component, Inspire opens the Select Project Components pane. The user can select the checkbox for each component they want to publish. When they click OK, Inspire opens the Publish Component screen. The user must fill out the required fields and click Publish. You see a notification that the publishing job has been created.
- If there are no XML components, Inspire gives you an error message. The publishing job is not created, and the workflow does not advance to the next step.
- In an active workflow, this action tells Inspire to check how many components are included in the previous Activity (such as Approve components) and take one of the following actions:
- InspireCompletenessReport.
- In an active workflow, the InspireCompletenessReport action tells Inspire to check how many components are included in the previous Activity (such as Approve components) and take one of the following actions:
- If there is one XML component, Inspire opens the Check component completeness screen so that you can select the items you want to see in the report.
- If there is more than one XML component, you can choose which components to run the report on first, and then select the items you want to see in the report.
- If there are no XML components, Inspire gives you an error message. The report is not created, and the workflow does not advance to the next step.
- In an active workflow, the InspireCompletenessReport action tells Inspire to check how many components are included in the previous Activity (such as Approve components) and take one of the following actions:
- InspireTranslationCompletenessReport
- In an active workflow, the InspireTranslationCompletenessReport action tells Inspire to check how many components are included in the previous Activity (such as Approve components) and take one of the following actions:
- If there is one XML component, Inspire opens the Translation Completeness Report screen so that you can select the languages and options you want to see in the report.
- If there is more than one component, you can choose which components to run the report on first, and then select the items you want to see in the report.
- If there are no components, Inspire gives you an error message. The report is not created, and the workflow does not advance to the next step.
- You must configure it exactly as described in: Automate translation completeness reporting in a workflow template. Otherwise, Inspire won't understand the Action as an automated process.
- In an active workflow, the InspireTranslationCompletenessReport action tells Inspire to check how many components are included in the previous Activity (such as Approve components) and take one of the following actions:
To create a new action:
-
Click
 Components.
-
In the Folders pane, select Workflows.
If you have moved the template to another folder, go that location instead.
-
In the Components pane, select a workflow.
To open the template, do one of the following:
- Double-click the file
- Right-click the file, and then select Edit...
- Click
 the Options menu, and then select Edit...
 Results: You see the workflow activities and transitions in the editor.
 -
In the toolbar at the top of the editor, click
 Actions.
Results: The Action Management screen opens.
Actions.
Results: The Action Management screen opens.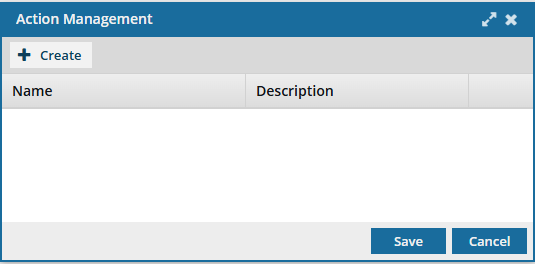
-
On the Action Management screen, click
 Create.
Results: The Create Action screen opens.
Create.
Results: The Create Action screen opens.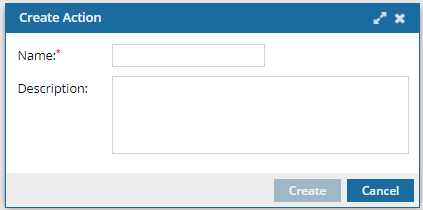
-
In Name, enter a unique title that describes a manual step that occurs during a transition.
 To create an automated Action that Inspire recognizes, enter one of the following Action Names exactly:
- InspireCreateApproval
- InspireApprove
- InspireUnapprove
- InspireCreateReview
- InspireCreateTranslation
- InspirePublish
- InspireCompletenessReport
- InspireTranslationCompletenessReport
-
To save your changes to the Action, click Create.
Results:
- You can see your new action listed on the Action Management screen.
- You can select your new action when creating or updating a Transition.
-
To save your changes to the template, do one of the following:
- If you are done updating the workflow, to close the workflow editor, click
 Save and Submit.
 - If you want to keep working but save your changes locally, click
 Save Progress.
You can manage actions in the following ways: - If you are done updating the workflow, to close the workflow editor, click