Modify table cells
When you're working on a document in the Oxygen-based editor, after you create a table you can join and split cells, align text, and add borders.
- In the editor, put your cursor in the table cell you want to modify.
-
To span a cell over multiple columns and rows, select two or more adjacent cells.
-
You must turn off Change Tracking. In the toolbar, make sure the Change Tracking button
 is not highlighted. If it is, to turn it off, click the Change Tracking button.
-
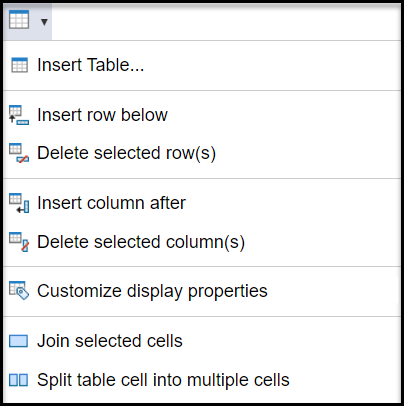
In the toolbar, right-click and then select
 Join selected cells.
-
You must turn off Change Tracking. In the toolbar, make sure the Change Tracking button
-
To split a cell, right-click and then select
 Split table cell into multiple cells.
-
You must turn off Change Tracking. In the toolbar, make sure the Change Tracking button is not highlighted. If it is, to turn it off, click the Change Tracking button.
- On the Split cells dialog, choose how many columns should be created inside the cell by selecting Number of columns.
- Choose how many rows should be created inside the cell by selecting Number of rows.
- On the Split cells dialog, click OK.
-
You must turn off Change Tracking. In the toolbar, make sure the Change Tracking button
-
To align cell text horizontally, right-click and then select
 Customize display properties.
-
To align cell text vertically, right-click and then select Customize display properties.
-
To add a border between cells, right-click and then select Customize display properties.