Create a translation project attribute

As an administrator, you may need to provide different information for different translation projects when you send content to translation. If a project requires work to be done in an application external to Inspire, then you can add attributes to send instructions or additional information.

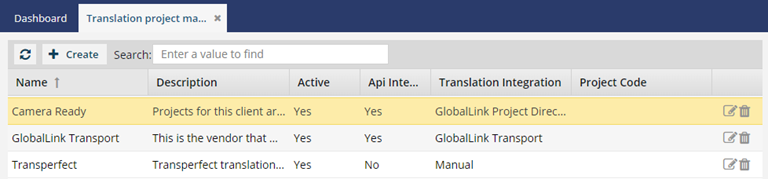
You identify that work will take place outside of Inspire using the API integration option. When you set this flag, any custom attributes you create are shown for this project type so you can add details or instructions for translating a specific component.

To create a custom translation project attribute:

  1. From the Administration_TopMenuOpt Administration menu, select Translation Settings, and then Translation project management.
  2. In the list, next to name of the project type that you want to add an attribute to, select the Update icon pencil_icon.
    Note: If the project type doesn't exist, follow the steps in Add a translation project.
  3. On the Edit Translation Project dialog, select the Attributes tab.
  4. On the Attributes tab, click Create.
  5. On the Create Translation Project Attribute screen, in the Display Name, enter a title that describes how the attribute is used, since this is what you'll see on the Inspire screens. The maximum length for the display name is 50 characters.
  6. In Name, enter an abbreviated title using 50 characters or less.
    This title is only used when Inspire sends the attribute to an external source.
  7. Optionally, in Description, enter text using 1000 characters or less.
  8. From the Type list, select an attribute type.
    A type can be a:
    • Boolean which appears as a checkbox
    • Collection which appears as a grid where you can enter multiple values
    • ComboBox which allows the user to select from a list of values or enter a new one in
    • Date which appears as a date picker
    • String which appears as a text box
  9. If you want to force the coordinator to put information into this attribute before sending a job to a vendor, select Required.
  10. If you want to include the attribute when the translation coordinator is creating a translation job, select Is Included.
    The attribute is displayed on the Translate component dialog on the Attributes tab.
  11. In Valid Values, click Create.
  12. In Values, enter an option that a translation coordinator can select when applying this vendor attribute. Note that Values can't contain spaces.
    For example, if you're using the attribute to send additional details about images, in Values you can enter a supported image type such as PNG.
  13. To save the value, in Valid Values, click Update.
  14. To create the attribute, on the Create Translation Project Attribute dialog, click Create.
  15. To save changes to the project, on the Edit Translation Project dialog, click Update.
    You see the Translation project management tab.