Branching FAQs
If you want to make a copy of a component and maintain a relationship between the original component and the new copy, you can use the Save as a branch option. This is helpful if there are different versions of a component that you want to track and update separately but still want to have a common starting point for the information.
 A content owner or administrator can set permissions to deny access to components or folders. If your permissions to content have been blocked and you are not an administrator, you cannot use the Save as branch option in a project's Content pane.

FAQ topics:
- How do I quickly branch a component with many references?
- Can I add more files to an existing branch?
- Can I choose which references are branched?
- What happens if I leave the branch Label empty?
- What if the topic I want to branch has Ditabase references?
- Can I choose where the branched copies are saved?
- Does Inspire set the reading order when branching?
- How can I track a branch?
- What do I use the branch management tool for?
- Can I unlink a branched component?
- Can I see all the branch relationships in a report?

How do I quickly branch a component with many references?
- Clearing this option means you don't have to wait for Inspire to list all the references in the List or Hierarchy views.
- This action branches the source component along with the references you select in the Branch referenced components dropdown menu.
- Go to the Branch referenced components dropdown menu and select Referenced components except xref/conref/images.
- Clear the Show referenced components option.
- Click Create.
 For more information, follow the steps in: Quickly create a branch.


Can I add more files to an existing branch?
Yes.
On the Save as branch screen, optionally, you can add a new Label or add the files to an existing branch by selecting its Label.

- To add files to an existing branch, select its Label:

a. Select the Add to existing Label checkbox.
b. In the new Label field, select from an existing label. This adds the files you are currently branching to an existing branch by appending the branch's label.

 If you select Add to existing Label, the Rename checkbox is no longer available since you are adding files to an already existing branch. If you want to use the Rename option, do any of the following:
- Clear the Add to existing Label option and create a new branch that can be given a name different from the component.
- After you complete the branch, open the Components browser, find the source of the branch you want to edit, and rename it.
 Rename a component
 You can also use the Branch Management tool to find the branch you want to rename, and then use the Go to option to find it in the Components browser.
  Go to a branched component


Can I choose which references are branched?
Yes, by selecting the Show referenced components option.
If you want to customize which references are branched, you can choose All referenced components, make sure the Show referenced components option is selected, and then in the Hierarchy or List view, select the checkbox for only the components you want to branch.

 You can't clear the checkbox for the source component. If you don't want to branch the source component, click Cancel, find the source component you want to use, and then select Save as a branch again.
![]() You may not see all referenced components on the Save as a branch screen.
You may not see all referenced components on the Save as a branch screen.
- Components that are referenced in the source component are only listed if:
- You select the Show referenced components option
- In the Branch referenced components dropdown menu you select anything other than No referenced components
- It doesn't have a tag applied to it called ExcludeFromBranch. For more details, read Prevent branching.

- On the Save as a branch dialog, the component you selected to branch is displayed in bold. This is considered the source component.
 The source component is displayed in bold only in List View.
 - In the Branch referenced components field, if you select anything other than No referenced components, you see a hierarchical list of other components that are referenced by the source component. In the following figure, this includes:
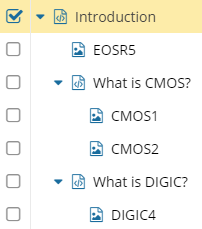
- The root parent topic (Introduction)
- Three child components
- One binary image (EOSR5)
- Two conceptual DITA topics (What is CMOS?, and What is DIGIC?)
- Two child components with children of their own
- What is CMOS (CMOS1, and CMOS2)
- What is DIGIC? (DIGIC4)
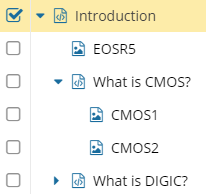
- By default, references are shown in a hierarchical view. You can expand and collapse parent topics in the hierarchical list to find the components you want to select.
- To expand all parent topics, click
 Expand all
- To collapse all parent topics, click
 Collapse all
- To expand one parent topic, click
 Expand children
- To collapse one parent topic, click
 Collapse children
- To expand all parent topics, click
- If you want to see references as a list, select List View.
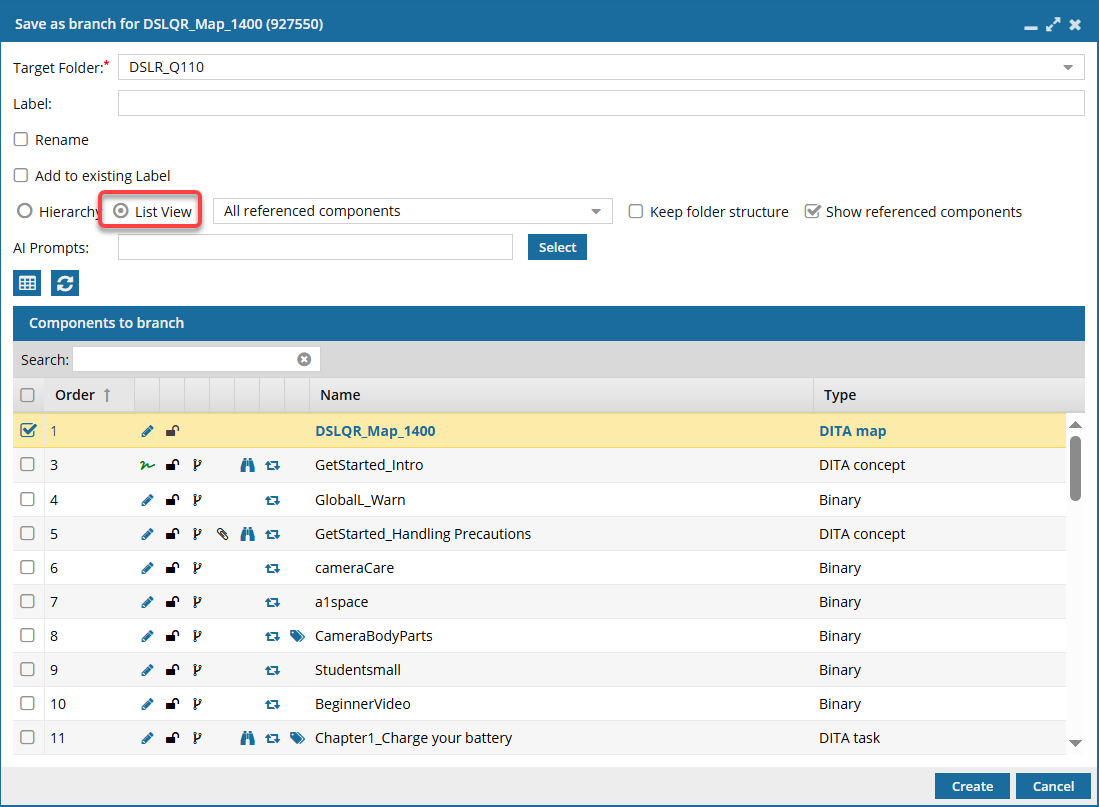
 For more information, follow the steps in: Create a component branch.


What happens if I leave the branch Label empty?

It depends on whether you are adding to an existing branch or not.
- If you don't select Add to existing Label: The Label option is available for you to enter a string of up to 50 characters (letters and numbers). The Label is attached as a suffix to the original component name to create a unique Name and File Name.
 Although the Label field is not required, if you don't add a value, the branch process will fail.
This failure happens because without a Label to create a unique Name and File Name, the branch process tries to create a copy of referenced files using the same name as the original.
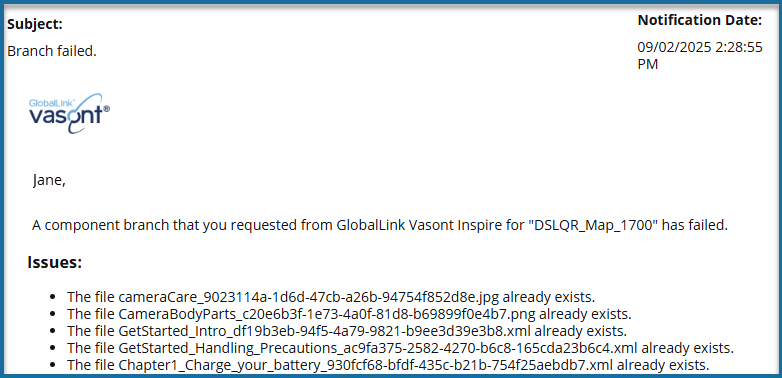
You see an error because the original file name already exists.
 To create a new branch name without a Label, use the Rename option on the Save as Branch screen. You can enter a new unique name, and then the branch can be successfully created with an empty branch Label because a unique name will be created.
 - If you select Add to existing Label: The Rename checkbox and the Label entry field options are no longer available and can remain empty. Instead, you must select the Label of an existing branch.
In this case, the components created with the Save As Branch option:
- Automatically have the selected label attached to the Name and File Name as a prefix (before the GUID - Graphical User Interface ID)
- Are added to the branch whose existing Label you selected
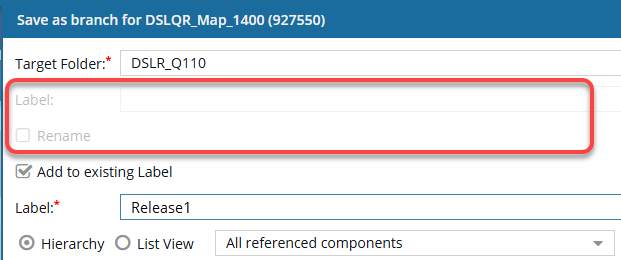
For example, for the selected topic DSLQR_Map_1400, you select Add to existing Label, and in Label choose Release1. After the branch is created:
- The map selected to Save as Branch has the existing label Release1 attached at the end of the original name and before any GUIDs.
- If any files referenced by the map are also branched, they have the existing Label Release1 attached after the original name and before any GUIDs.
- The map and referenced files are added to the Release1 branch.
- Name: DSLQR_Map_1400_Release1
- File Name: DSLQR_Map_1400_Release1_{GUID}


What if the topic I want to branch has ditabase references?
Inspire now supports content references to ditabase topics. A ditabase topic is a composite topic. Before maps, ditabase was used to collect multiple topics and structure them within a single topic file.
- If you branch a topic and:
- It has a conref to a ditabase topic
- You include all referenced components in that topic
⇒ The ditabase references are branched and valid.
 For more information, follow the steps in: Create a component branch.


Can I choose where the branched copies are saved?
By default: Branch copies of all components (source and reference) that you select are saved in the Target Folder.
For example:
- A source component called Chapter2_Attach the strap is stored in a Target Folder called Tasks.
- Two image files are referenced by the source component and are stored in an Images folder.
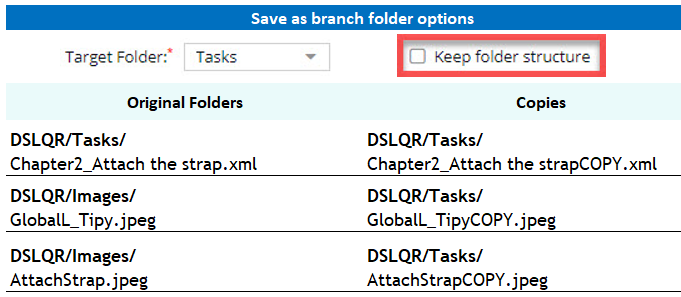
If you don't select the Keep folder structure option.
- Any components you select to branch—by default the branched copies are created in the Target Folder (Tasks).
- This happens even if the referenced components are currently stored in a different folder.
- You can select a different Target Folder. If you do, all branched copies are saved in that one folder.
For example:

Change the default
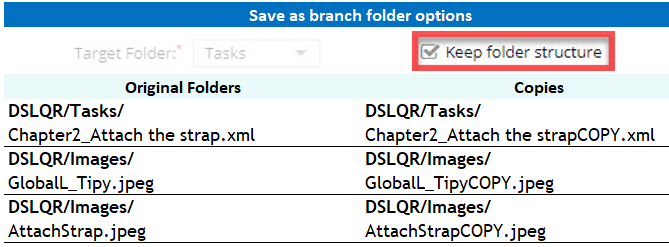
If you want to create a branched copy of the source and image components, but you want the branched copies to be saved in their current folders, you can select the Keep folder structure option.

In this example:
- You select the Keep folder structure option.
 After you select the Keep folder structure option, the Target Folder option is greyed out and becomes unavailable.
 If you want to select a different Target Folder, do it before you select Keep folder structure or clear the Keep folder structure option and choose a different Target Folder.
 - You select the source component and the two image files.
- After you click Create, the branched copy of the source component is saved in Tasks.
- The branched copies of the images are saved in the Images folder.

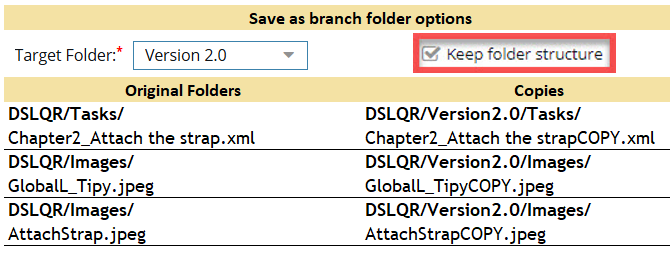
 If you selected a different Target Folder and the Keep folder structure option, Inspire creates the branched copies in the same folder structure as they had, but under the Target Folder you just selected. If the folders do not exist, Inspire creates them.
For example:
![]() In this example, the branched copies are found in different folders according to where the original was stored, but under the Target Folder Version 2.0.
In this example, the branched copies are found in different folders according to where the original was stored, but under the Target Folder Version 2.0.

 For more information, follow the steps in: Create a component branch.


Does Inspire set the reading order when branching?
Yes.
Whenever you save a component by branching, Inspire ensures content that is read from Right-to-Left displays correctly in Oxygen.
- If it doesn't exist yet
- Only if the language Reading property is rtl (Right-to-Left)
- For example:
<concept id="concept_guid" xml:lang="ar-Ar" dir="rtl"> - Inspire makes no changes if the language Reading property is ltr (Left-to-Right)


How can I track a branch?
There are several ways to find a branched component:
- Use the Label
- Look for icons in the Components browser
- Use the Branch Management tool
Use the Label
When you're creating a branch, you can now add a Label. This allows you to add more information about why the branch was created or a version number.

- The Label is attached to the component name.
- For example, if you right-click a component named GetStarted, and select Save as branch... when you go to the Label field and enter "New version updates", after you click Create:
- Component name = GetStarted_New version updates
- The Filename uses the Component name with the Label, and then adds a GUID to make it unique. For example:
- File name = GetStarted_New_version_updates_0b2426a1-1831-4114-8611-5b8db7edd7ab.xml
- For example, if you right-click a component named GetStarted, and select Save as branch... when you go to the Label field and enter "New version updates", after you click Create:
- You can also see the Label on the Component Details screen, on the Branches tab. Select the component, and from the right-click menu select Details. Select the Branches tab.

 The Name can also be known as the Label.
- This is because the snapshot Name doesn't replace the component name, but allows you to identify why the history record was created.
- When you create a snapshot on demand, the Name becomes the label but is always shown as Name.
- When you branch a component, you add a title in the Label field. In the History record (of snapshots), the Label is always shown as Name.
- Long unique numbers are also attached to custom labels, so be sure to keep your label short. For MyLabel__93746df4-558f-4414-9423-52835fa5d2cd.
- Later, if you update a snapshot, you can edit the Name (Label) as long as the history record isn't for a Branch action.
- You cannot update the Name (Label) for a snapshot where the Action is Branch.
If you open the Component Details, select the History tab, and choose a record where Action is Branch you cannot select the Update option.
- You can update the Name (Label) for all other types of snapshots.
Look for icons in the Components browser
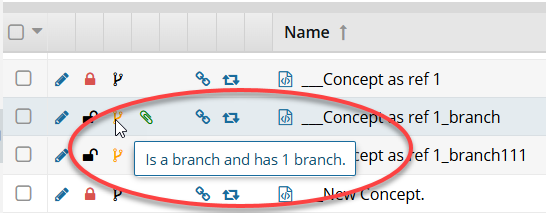
After you create a branch, in the Components browser, the branched components have an icon corresponding to their place in the branch.
![]()
- Black
 is the source component for a branch.
 When you hover your cursor over the black branch icon, you see a tooltip telling you it has a branch and also how many branches have been created from it. For example, Has 2 branches.
- Green
 was branched because a source component referenced it.
  When you hover your cursor over the green branch icon, you see a tooltip telling you it is part of a branch. For example, Is a branch.
- Orange
 is both the source of one branch and included in another branch because a different source component referenced it.
 When you hover your cursor over the orange branch icon, you see a tooltip telling you it is part of a branch and also how many branches have been created from it. For example, Is a branch and has 1 branch.

Use the Branch Management tool
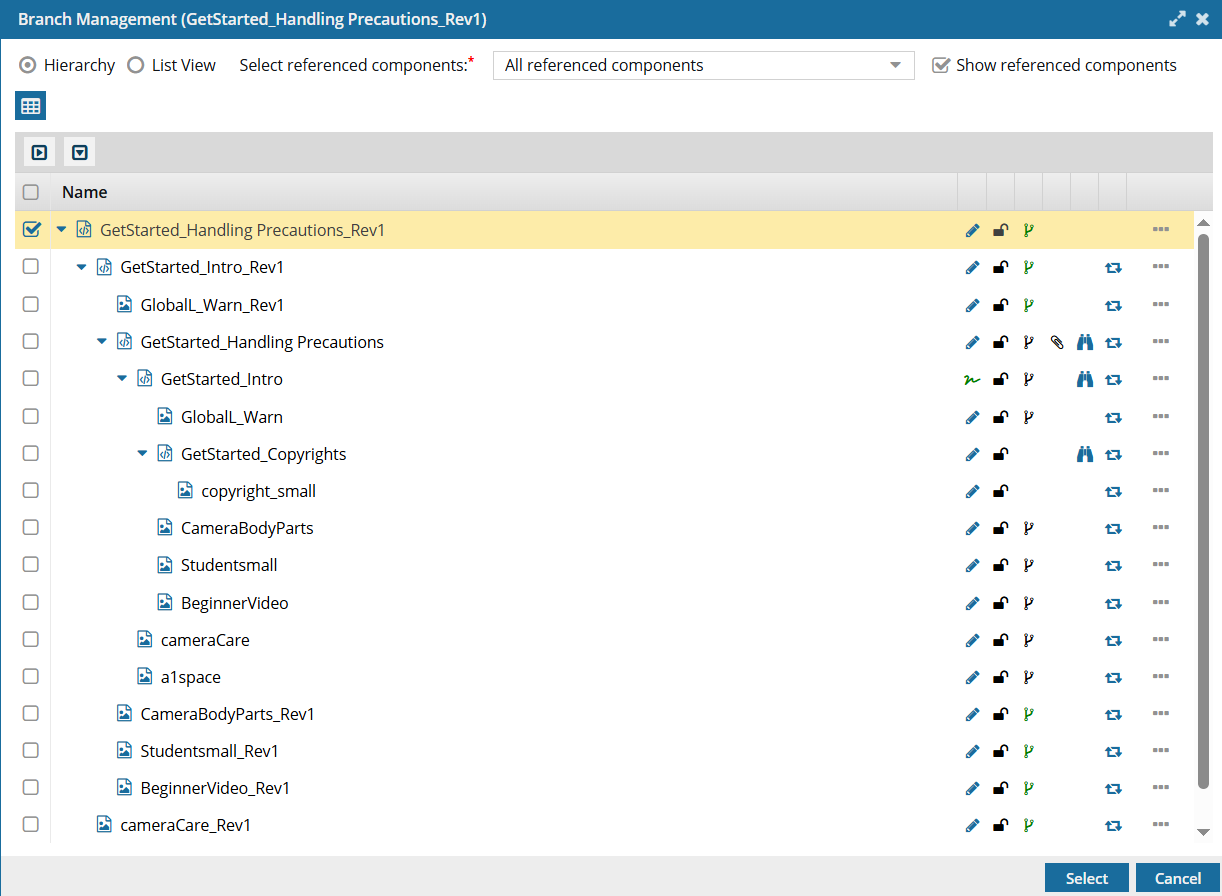
The Branch Management tool lets you see the list of references and relationships that exist for the branched component.
 Use the Branch Management tool


What do I use the branch management tool for?
After you create a branch, you can view the list of references and relationships that are created for the branched component. This helps you understand which component is the original, which is the branched copy, and if the source of a branch references this component.
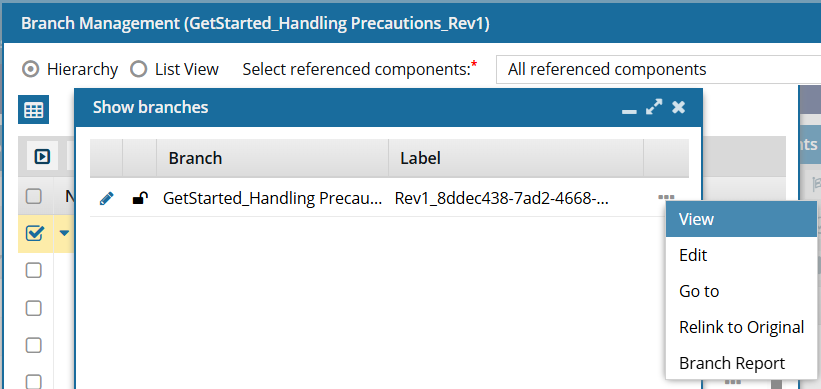
Using the Branch Management tool, you can manage all aspects of a branch, including:
- View: See all related branches
- Edit: Update the branched component
- Go to: See where the branched file is saved
- Relink to Original: Unlink the branched component
- Branch Report: Create reports on component branches
Can I unlink a branched component?
Yes, in the Branch Management tool.
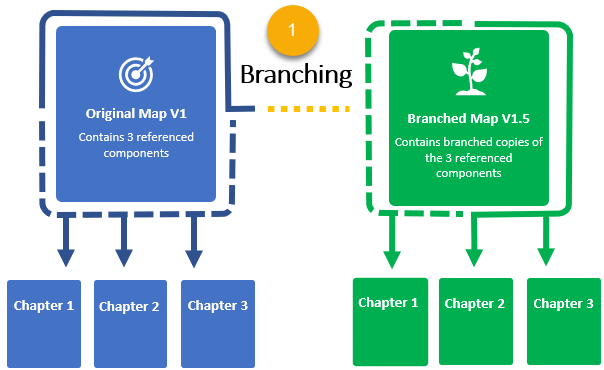
 After you make a branched copy of a component, Inspire maintains the relationship between the original component and the new copy. (In the diagram, this is shown by the yellow dotted line between the original, Map V1, and the branched copy, Map V1.5.)
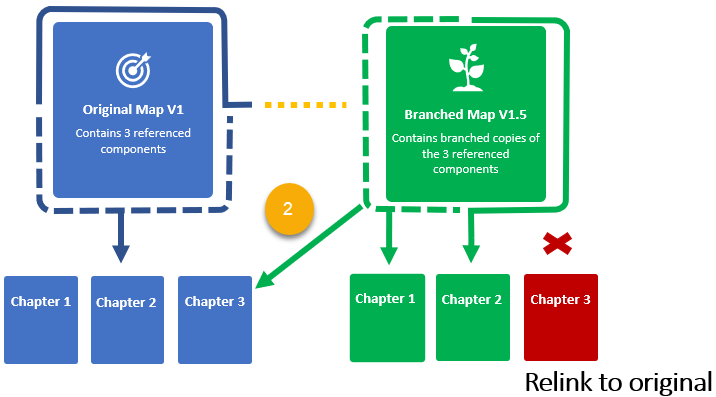
 If you want the branched source to use the original version of a referenced component, you can unlink the branched copy.
- The existing relationship between the source branched component (Map V1.5) and its reference to the branched component you are unlinking (the red Chapter 3) is deleted.
- Inspire creates a new component relationship between the source branched component (Map V1.5) and the original component reference (the blue Chapter 3). (In the diagram, this is shown by the green arrow with the yellow dots.)
- The branched source component (Map V1.5) now references the original component (the blue Chapter 3).
- The unlinked branched component (the red Chapter 3) remains and is no longer referenced by any other source component.


Can I see all the branch relationships in a report?
Yes.
To see a report on the relationships a component has with other components, if it's the source of a branch, and find the location of all components in the branch, you can generate and view a branch report.

 Before you begin
- You cannot create a branch or a branch report from inside a project.
- Branch reports use the source of a branch to find all relationships for the selected component.
- You cannot create a branch report from a branch that is marked with
 Is a branch (a green branch icon).
 - You can create a branch report from a branch marked as
 Has a branch or
  Has and Is a branch.
- You cannot create a branch report from a branch that is marked with

In the  Components browser, you can select a branched component, right-click or use the
  Options menu to select Reports, and then select Branch Report.
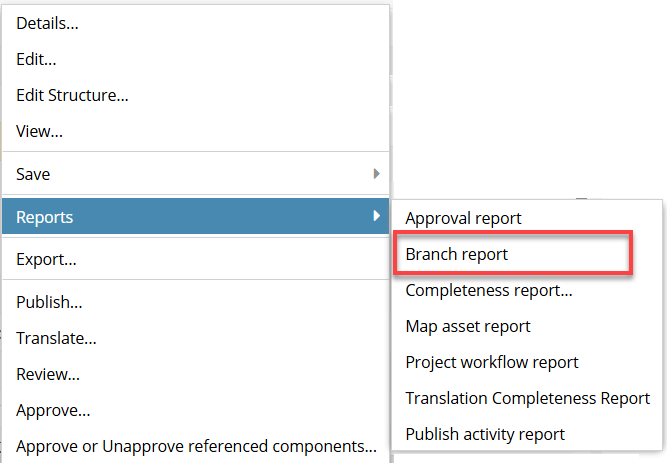

 You must select a component with the following properties in order to see the Branch Report option:
- Is the source of a branch
- When hovering over the branch icon, identified as Is a Branch
- Has the
 icon for Is a Branch
You can also go to the Selected Components pane, select  the Reports menu, and then select Branch Report.
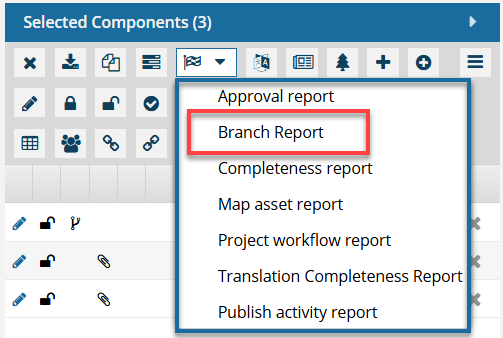

 You see a separate notification for each component you select. You also get a separate report for each component you select.
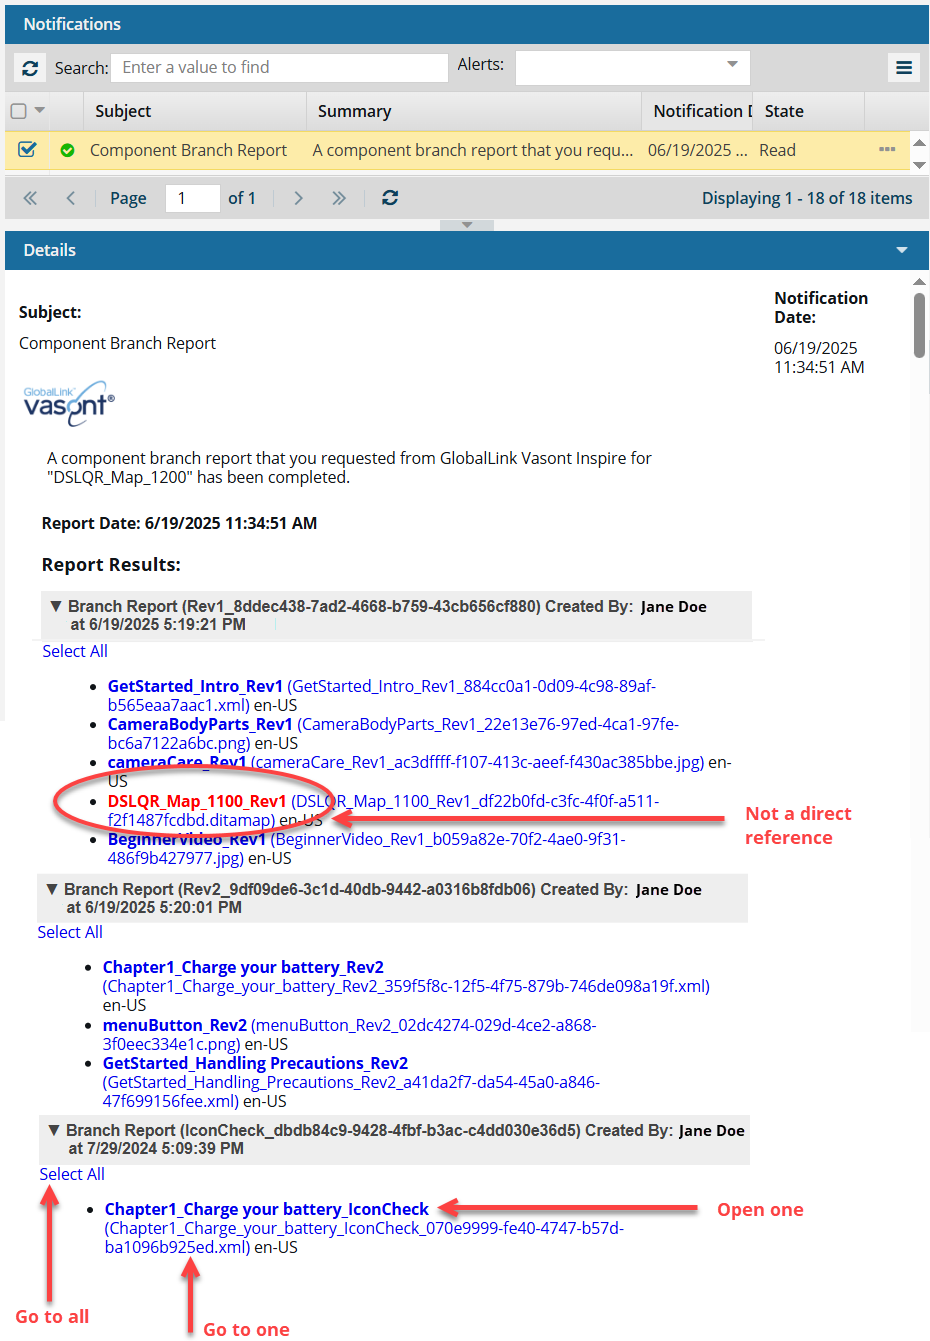
In the example report above:
- The component that you selected to run the report on (DSLQR_Map_1200) is the source of a branch (DSLQR_Map_1200_Rev2). The branch has the same component name with a Label of Rev2.
- The source component references topics that have been branched from another component (GetStarted_Intro_Rev1, from DSLQR_Map_1100_Rev1).
- There is a section header for each branch that contains the same topics referenced by the component that the report was run on (DSLQR_Map_1200).


You can use this report to do the following:
- See indirect references. You can find components (shown in red) that have references in common with the selected component (DSLQR_Map_1200). The components shown in red contain one or more of the same topics in the source component. They contain a reference as a branch of another branch but not a direct reference from the source component.

In this case, the map DSLQR_Map_1100_Rev1 (shown in red) references CameraBodyParts_Rev1. The source component (DSLQR_Map_1200) also references CameraBodyParts_Rev1.
 This is helpful because it shows you that there are branched maps you might want to review and consider connecting the source component to.
 - Go to all. If you want to open the folder that contains all the components listed in a section of the report, click the Select All link.

- If you click this link from an email, a browser tab opens, and Inspire opens to the Components browser.
- If you click this link from a notification inside of Inspire, the Components browser opens.
- In the browser, you see all of the components highlighted from that section of the report.
- If the components are in different folders, you see the items from the first folder listed in the Folders pane.
- The components are also listed in the Selected Components pane
- Open one. If the component's content needs to be updated, you can click on the component Name, which is a link that opens the component in the Oxygen editor.

- The Name is listed first.
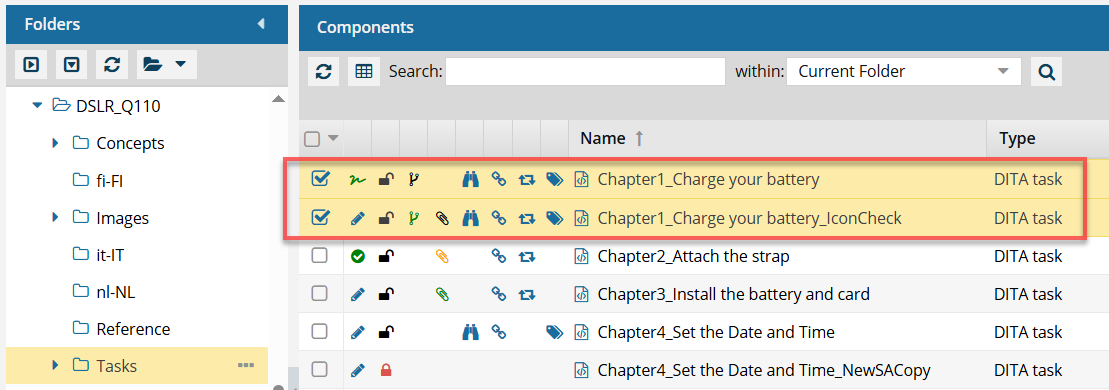
- The Name does not contain the file extension. For example, "Chapter1_Charge your battery_IconCheck".
- If the component is locked or a binary, you see the component in a read-only viewer
- Go to one. If you need to update a component using a system function, such as Rename, you can click on the File Name which is a link that opens the folder where it's stored.

- The File Name is listed second, after the shorter Name and in parenthesis ().
- The File Name contains the file extension. For example, "Chapter1_Charge_your_battery_IconCheck_070e9999-fe40-4747-b57d-ba1096b925ed.xml.