Rename a project component
You can change a component's display name and file name if necessary. Changing the Component Name affects the name you see in the Content browser. Changing the File Name changes the name you see when referencing a component. You can't change the GUID part of a File Name.
 You may not be able to access the Rename option in the following conditions:
Your permission to access a component or folder has been blocked. A content owner or administrator can set permissions to deny access to components or folders. If your permissions to content have been blocked, and you are not an administrator, you cannot use the Rename option in a project's Content pane.
You do not have the required Roles. An Inspire administrator can define at the user and role level whether the Rename... action is available.
- By default, only administrators can rename components in Inspire.
- You can see the Rename... option only if you're an administrator or have the can_rename_file module property.
- The ability to change a topic title in Oxygen is not affected by this module property.
- The ability to change a folder name is not affected by this module property.
After you change a component name, it's added to the Changeset list with the following properties:
An Action of Update
A Process type called Rename
After you rename a file, it's added to the Changeset list with the following properties:
An Action of Update
A Process type called RenameFileName

 For details on the effects of changing a Component Name or File Name, read Rename a component.
You can also rename a component in the Component browser. Read Rename a component in the Component's browser.
To rename a project component:
-
Click
 Projects.
-
On the Project Management tab, double-click the row of the project you want to open.
 You can also open the project by:
- Selecting the row, right-clicking, and selecting Open.
- Selecting the row, clicking
 the Options menu, and selecting Open
-
In the Content pane, to see all components in all folders, click the expand all arrow
 .
.
-
To select a component, click the name.
You can verify you have the correct component by looking in the Content details pane at the preview.
- If the pane isn't open, click the down arrow in the pane's title bar.
- If you think the preview isn't showing the latest version, click
 Refresh.
To see the complete name of the components and use advanced search to search through all folders within a project, click  the Select Project Components option.
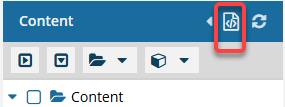
- To see more text in the Components pane, collapse the Folders panel by clicking
 the arrow that's pointing left.
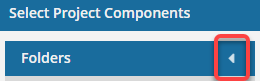
- To quickly expand or collapse the folders, use the expand all and
 collapse all buttons.
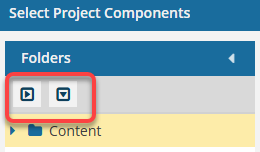
- To find a component by keyword, in Search, enter words or phrases used in the component's name. In Within, select where in the project you want to search (Current Folder, Current and Subfolders, All Folders). Click Search
 .
. - To find a component by creating a query, click
 Advanced Search.
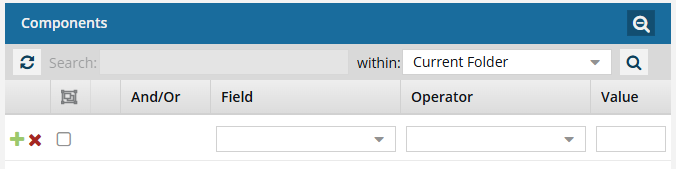
- Fields correspond to the columns in the grid. In the Field list, select the column you want to search in, such as Component State.
- After you select a Field, you must describe the relationship it has with the Value. In the Operator list, to include or exclude some or all of the values that you want to use, select an operator, such as
<>(not equal to). - The options in the Value list change depending on what you selected in Field. In the Value, select or enter the word, phrase, or number you are searching for in relation to the Field. For example, Component State (Field)
<>(Operator) Invalid (Value). - In Within, select where in the project you want to search (Current Folder, Current and Subfolders, All Folders).
- Optionally, to enter another clause to your query, click
 Add. Select whether you want to narrow your search by requiring that all statements must be true (And), or expand your search by requiring that any of the statements can be true (Or).
 - Click Search .
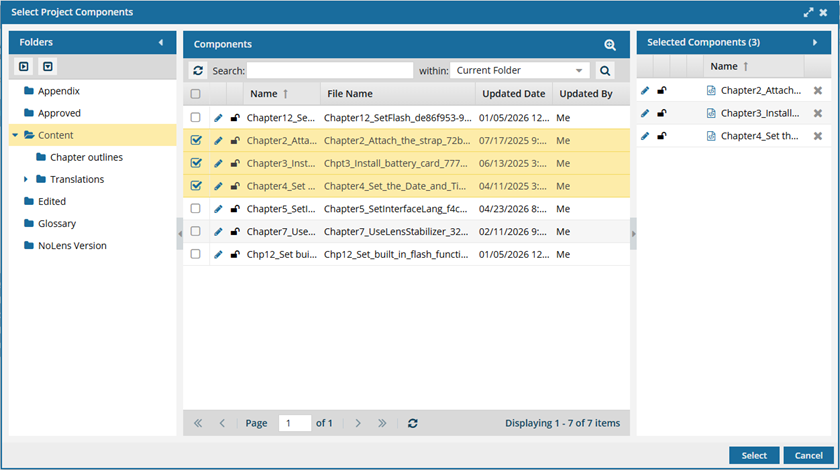
- To select multiple components to manage, select the checkbox for each component.
 Result: The components are listed on the Selected Components panel.
 - To close the Select Project Components screen, click Select.
-
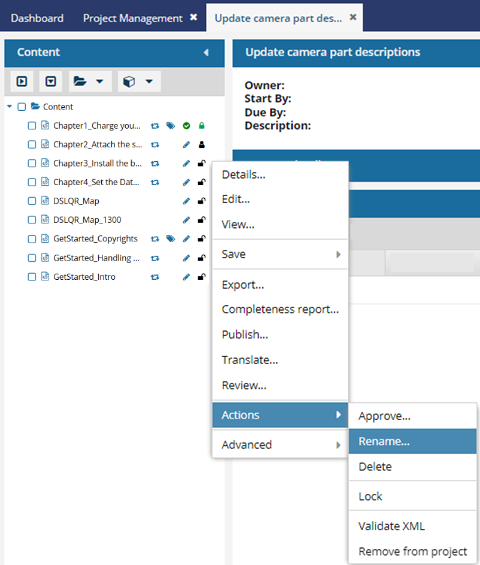
Click the component's Options menu, select Actions, and then select Rename...

-
On the Rename screen, to change the display name, in Component Name, do one of the following:
- Delete the old name and enter a new one.
- Edit the existing name.
 The Component Name cannot be more than 100 characters.
-
Optionally, you can also change the text label and extension of the File Name.
-
In File Name, edit the text.
File naming guidelines:
- If possible, try to avoid using DITA control characters such as square brackets ([]) and slashes (/) in the name.
- Use a File Name of 150 or fewer characters. The File Name and GUID together must not exceed 200 characters.
-
Optionally, in Locale, you can specify the language region.
Locale guidelines:
- You must enter 5 characters using a pattern of aa-AA.
- For example, if this component is in Spanish, you would enter es-ES.
- The language region must exist in Inspire. If you're an administrator, follow the steps in Create a language definition.
- The Locale you enter is appended to the File Name. For example, {filename}_{locale}_{GUID}.{extension}
-
Optionally, in Extension, you can edit the text to add different characters that represent a file type.
Extension guidelines:
- Use caution when changing a file's extension. This action changes the way Inspire and programs on your computer read the file.
- You don't need to enter a period before the extension.
-
In File Name, edit the text.
-
On the confirmation screen, review the number of files that reference this component and will be updated with the new Component Name and the File Name, if changed.
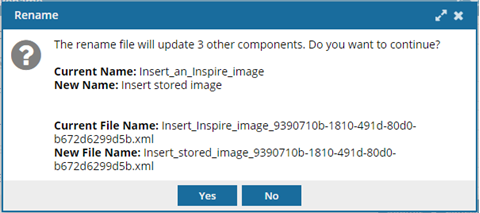
-
On the confirmation screen, click Yes.
Results: Inspire refreshes the component hierarchy.
- The renamed component is highlighted.
- The renamed component displays in the correct place in the alphabetized hierarchy according to its name when sorted by the Name column.
- If you look in the component's Details, and select the History tab, you see a new entry for the name changes.
- Look in the Action column to see Update.
- Look in the Type column to see Rename as the process type.
Look in the User column to see your name.
The Last Updated By column won't change to your name because you didn't update the content
If you changed a component's File Name, all files that linked to the old name now link to the new name and are valid.